


This entry in our Cisco ISE blog series expands on the previous entry, EAP Authentication Types. Some of the vernacular we established in that entry will be repeated here, but not explained. So, if you haven’t had a chance to read that one yet, go ahead, we’ll wait right here for you! In this entry, we will take a deep dive at the provisioning required when using the Microsoft native 802.1X/EAP supplicant.
Overview of the Provisioning Steps
To better set the stage, this entry will focus specifically on Windows domain joined computers, where the entire provisioning can be completed by centrally managed Group Policy Objects. Furthermore, in our example we will be providing the configuration examples for each PEAP-EAP-TLS and PEAP-EAP-MSCHAP-V2. Remember that in your deployment, you will (likely) only be using one or the other of these EAP methods. Although, it is entirely possible to run a set of supplicants (Corp endpoints for example) on one and another set of supplicants (BYOD endpoints for example) on another. Here is an overview of the provisioning steps required for each of the above mentioned EAP methods.
PEAP-EAP-TLS
You will recall from the previous entry in this series that PEAP-EAP-TLS uses certificate authentication to authenticate both the authentication server and client. This setup assumes that a Microsoft CA server exists and its root/intermediate certificates are already trusted by the Windows domain joined PC’s. Additionally, we assume that the authentication server (ISE PSN) has already been provisioned with a EAP server authentication certificate issued by this same Windows CA.
- Create and deploy a certificate template for 802.1X auto-enrollment using Microsoft CA server
- Pro-tip -> If you already have certificates deployed from a Microsoft CA to your Windows domain users and computers, those existing certificates may be suitable for 802.1x already! However, you will need to evaluate the certificate attributes on a case by case basis to confirm.
- Configure the GPO settings for:
- Certificate Enrollment (optional - if you are deploying new certs for 802.1x)
- Wired 802.1X Supplicant (required for 802.1x on wired networks)
- Wireless 802.1X Supplicant (required for 802.1x on wireless networks)
PEAP-EAP-MSCHAP-V2
This setup assumes that the authentication server (ISE PSN) has already been provisioned with an EAP server authentication certificate issued by a Microsoft CA server whose root/intermediate certificates are already trusted by the Windows domain joined PC’s.
- Configure the GPO settings for:
- Wired 802.1X Supplicant (required for 802.1x on wired networks)
- Wireless 802.1X Supplicant (required for 802.1x on wireless networks)
PEAP-EAP-TLS Provisioning Steps
The following procedure can be used as a reference for creating your certificate templates, creating your 802.1x supplicant configurations, and deploying them via a Windows Domain GPO.
Create the certificate template!
The settings illustrated here have been taken from a working production deployment.
User Certificate Template Settings
Start by duplicating the existing default “User” certificate inside of the “Certificate Templates” management console. Default settings should be assumed if not mentioned below.
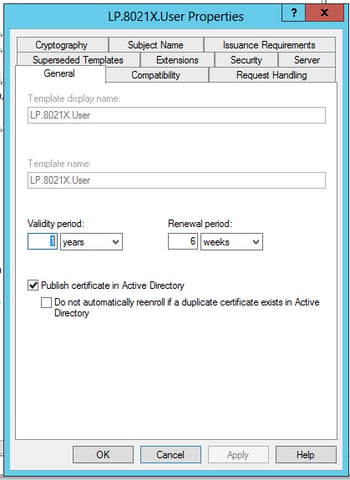
General Tab:
- Optional - Set the duration the certificate will be valid for. (Default is usually OK!)
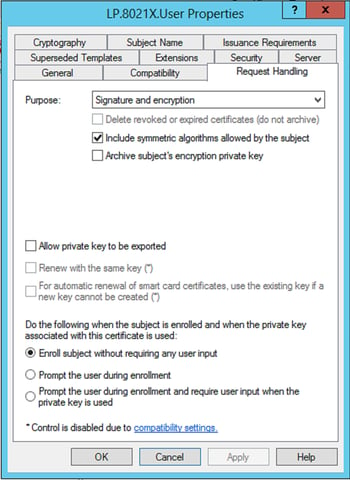
Request Handling Tab:
- Optional – Uncheck “Allow private key to be exported” (best practice)
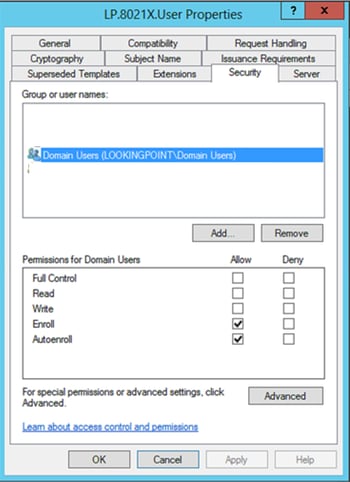
Security Tab:
- Required – Select “Domain User” group and check the “Autoenroll” box
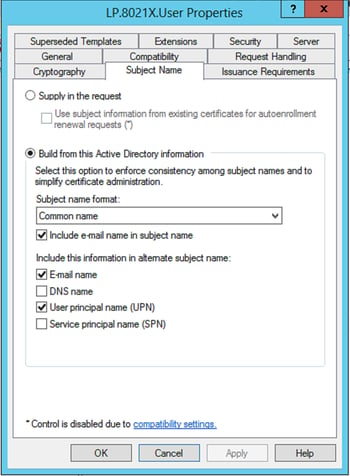
Subject Name Tab:
- Optional – Select “Subject name format” of “Common Name” for easier readability. This field won’t be used to obtain the username, we’ll use the UPN from the SAN (which is a default setting on the template).
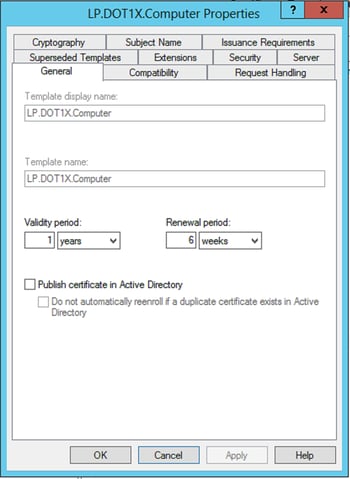
Computer Certificate Template Settings
Start by duplicating the existing default “Computer” certificate inside of the “Certificate Templates” management console. Default settings should be assumed if not mentioned below.
General Tab:
- Optional - Set the duration the certificate will be valid for. (Default is usually OK!)
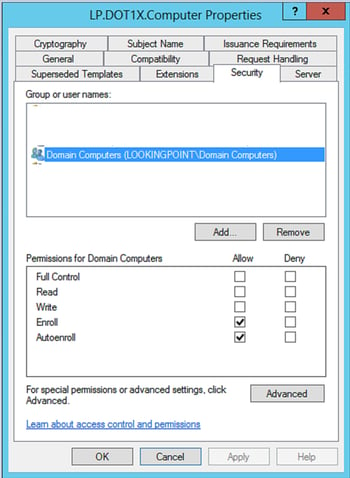
Security Tab:
- Required – Select “Domain Computer” group and check the “Autoenroll” box
Enable the certificate template!
After the certificate templates above have been created, they need to be enabled in order to use them. In your Certificate Authority management console, right-click Certificate Templates, and select New Certificate Template to Issue. Select your templates created above! Next, we will create a GPO to push to the users/computers that leverage these autoenrollment templates.
Create the GPO!
We will create (or modify) two different GPO’s; one for the user OU and one for the computer OU. The user OU GPO will be used to enable the certificate auto-enrollment. The computer OU GPO will be where most of the setting we need get applied. It will be used to enable the certificate auto-enrollment for the computer, and additionally we will configure the native Windows 802.1X supplicant for both the Wired and Wireless network. Here we are focusing on the settings within the GPO that are applicable to our topic. We are not making any recommendations about whether or not to create a new GPO, modify an existing GPO, or where those GPO’s should be placed in your hierarchy. Those decisions are left for you or your domain administrator. Best of luck!
User GPO
This is the easy one! The relevant settings to set the certificate auto-enrollment are shown below.
Certificate Auto-Enrollment - Navigate in your GPO to:
User Configuration > Policies > Windows Settings > Security Settings > Public Key Policies
-Right-click on Certificate Services Client – Auto-Enrollment and set as follows

That is all for the user GPO! Nice work!
Computer GPO
Now for the long one! Just remember, you only have to do this once and your 802.1X supplicant provisioning is 100% automated for all eternity (ok that may be a little extreme…but you get the point)! The relevant settings to set the certificate auto-enrollment and 802.1X supplicant configurations are shown below.
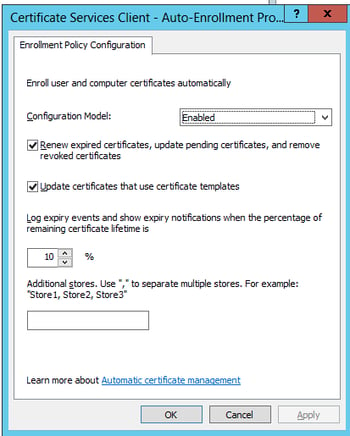
Certificate Auto-Enrollment - Navigate in your GPO to:
Computer Configuration > Policies > Windows Settings > Security Settings > Public Key Policies
-Right-click on Certificate Services Client – Auto-Enrollment and set as follows
Wired 802.1X - Navigate in your GPO to:
Computer Configuration > Policies > Windows Settings > Security Settings > Wired Network Policies
-Right-click on Wired Network Policy then select Create a New Wired Network Policy
-Follow the screenshots below
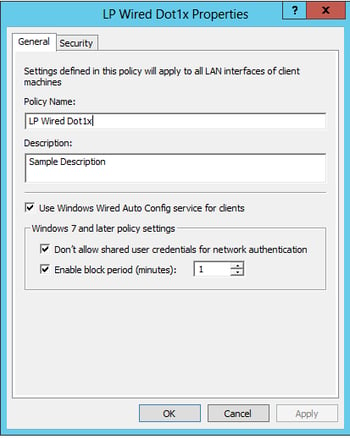
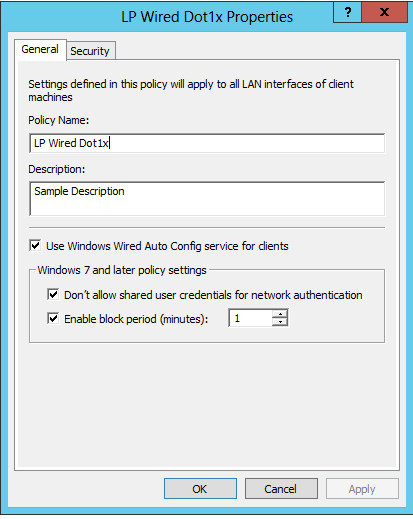
General Tab:
- Required – Select “Use Windows Wired Auto Config service for clients”
- Optional – Check “Don’t allow shared user credentials …” (best practice)
- Optional – Select “Enable block period” and set to one minute (Why? – Read Me)
Security Tab:
- Defaults are great! Click that Properties button next to Microsoft: Protected EAP (PEAP)!
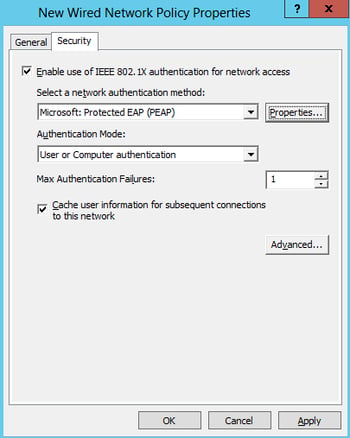
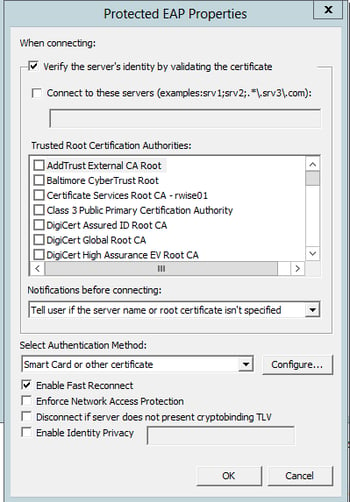
Microsoft: Protected EAP (PEAP) Properties:
- Trusted Root Certificate Authorities: Check the box of the Root CA that issued your Cisco ISE/RADIUS server EAP certificate.
- If this CA does not appear in this list, it means that the Root CA does not exist in your domain controller’s Trusted Root CA folder (On the DC > MMC > Add/Remove Snap-in > Certificate Management > Local Computer).
- Select Authentication Method: Select Smart Card or other certificate
- For the next step, click Configure next to this selection
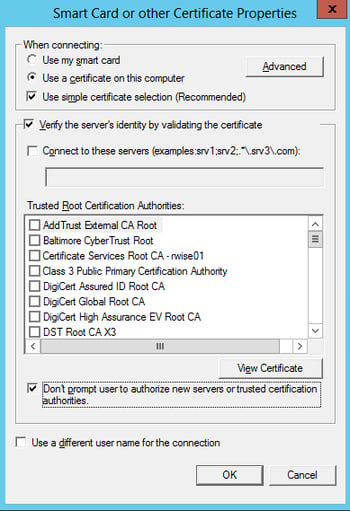
Smart Card or other Certificate Properties:
- Trusted Root Certificate Authorities: Check the box of the Root CA that issued your Cisco ISE/RADIUS server EAP certificate.
- Check the box for “Don’t prompt user to authorize new servers or …” (this suppresses a certificate warning the client receives even when the certificate is trusted)

Configure the Wired AutoConfig Service - Navigate in your GPO to:
Computer Configuration > Policies > Windows Settings > Security Settings > System Services
-Right-click on the Wired AutoConfig service and select Properties, set as follows.

Wireless 802.1X - Navigate in your GPO to:
Computer Configuration > Policies > Windows Settings > Security Settings > Wireless Network Policies
-Right-click on Wireless Network Policy then select Create a New Wireless Network Policy
-Follow the screenshots below
General Tab:
- Defaults are great! Click “Add..” and select “Infrastructure” for the next step!

Wireless Profile – Connection Tab:
- Input your Network Name, then click Add.
- Defaults are fine the rest of the way. The last two check boxes may be interesting to you, if so, check them as well (optional).

Wireless Profile – Security Tab:
- Click the Properties Button next to Microsoft: Protected EAP (PEAP)
Microsoft: Protected EAP (PEAP) Properties:
- Trusted Root Certificate Authorities: Check the box of the Root CA that issued your Cisco ISE/RADIUS server EAP certificate.
- If this CA does not appear in this list, it means that the Root CA does not exist in your domain controller’s Trusted Root CA folder (On the DC > MMC > Add/Remove Snap-in > Certificate Management > Local Computer).
- Select Authentication Method: Select Smart Card or other certificate
- For the next step, click Configure next to this selection

Smart Card or other Certificate Properties:
- Trusted Root Certificate Authorities: Check the box of the Root CA that issued your Cisco ISE/RADIUS server EAP certificate.
- Check the box for “Don’t prompt user to authorize new servers or …” (this suppresses a certificate warning the client receives even when the certificate is trusted)
End PEAP-EAP-TLS Provisioning! You did it!!!
PEAP-EAP-MSCHAP-V2 Provisioning Steps
The following procedure can be used as a reference for creating your 802.1x supplicant configurations and deploying them via a Windows Domain GPO.
Hey guess what? This is a lot easier to provision than PEAP-EAP-TLS! Most of this is repeated from the PEAP-EAP-TLS section that came before, but worth it so you have it all in one place. Here we don’t have any certificate templates to fuss with, so we’ll jump straight into the GPO configuration.
Create the GPO!
We will create (or modify) one different GPO for the computer OU. The computer OU GPO will be where all of the settings get applied. It will be used to configure the native Windows 802.1X supplicant for both the Wired and Wireless network. Here we are focusing on the settings within the GPO that are applicable to our topic. We are not making any recommendations about whether or not to create a new GPO, modify an existing GPO, or where those GPO’s should be placed in your hierarchy. Those decisions are left for you or your domain administrator. Best of luck!
Computer GPO
Now for the long one! Just remember, you only have to do this once and your 802.1X supplicant provisioning is 100% automated for all eternity (ok that may be a little extreme…but you get the point)! The relevant settings to set the certificate auto-enrollment and 802.1X supplicant configurations are shown below.
Wired 802.1X - Navigate in your GPO to:
Computer Configuration > Policies > Windows Settings > Security Settings > Wired Network Policies
-Right-click on Wired Network Policy then select Create a New Wired Network Policy
-Follow the screenshots below
General Tab:
- Required – Select “Use Windows Wired Auto Config service for clients”
- Optional – Check “Don’t allow shared user credentials …” (best practice)
- Optional – Select “Enable block period” and set to one minute (Why? – Read Me)
Security Tab:
- Defaults are great! Click that Properties button next to Microsoft: Protected EAP (PEAP)!
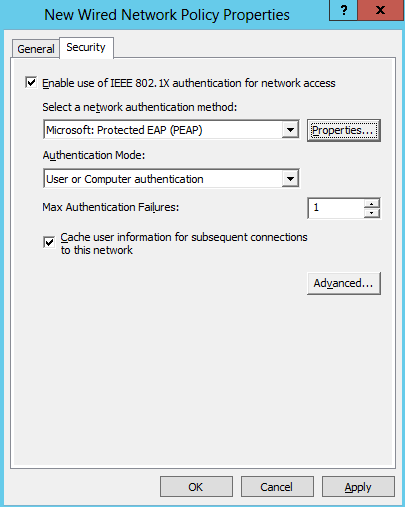
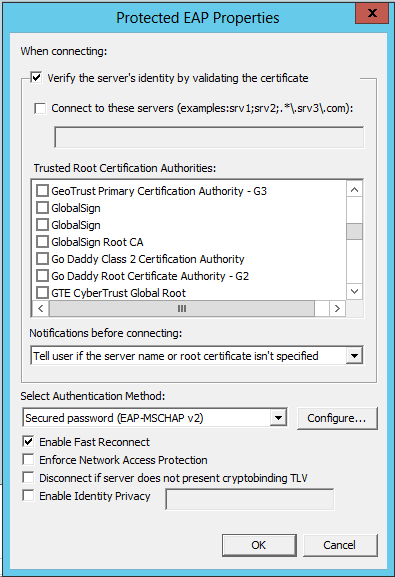
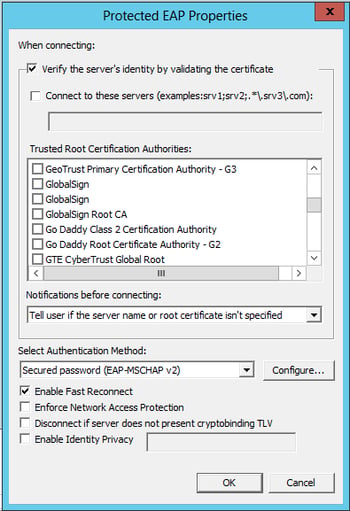
Microsoft: Protected EAP (PEAP) Properties:
- Trusted Root Certificate Authorities: Check the box of the Root CA that issued your Cisco ISE/RADIUS server EAP certificate.
- If this CA does not appear in this list, it means that the Root CA does not exist in your domain controller’s Trusted Root CA folder (On the DC > MMC > Add/Remove Snap-in > Certificate Management > Local Computer).
- Select Authentication Method: Secured password (EAP-MSCHAP v2)
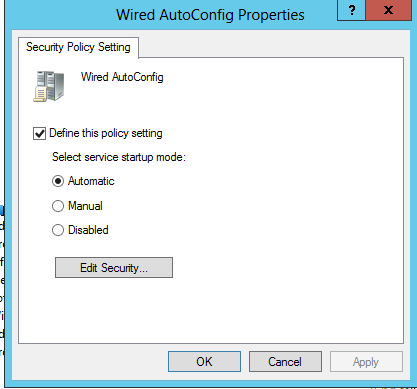
Configure the Wired AutoConfig Service - Navigate in your GPO to:
Computer Configuration > Policies > Windows Settings > Security Settings > System Services
-Right-click on the Wired AutoConfig service and select Properties, set as follows.
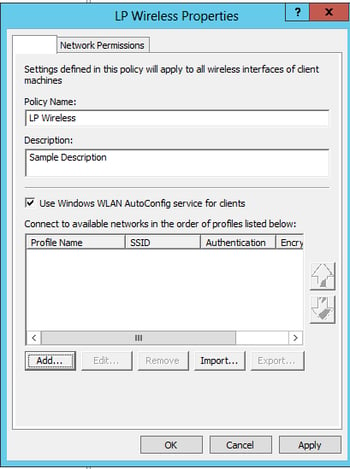
Wireless 802.1X - Navigate in your GPO to:
Computer Configuration > Policies > Windows Settings > Security Settings > Wireless Network Policies
- Right-click on Wireless Network Policy then select Create a New Wireless Network Policy
- Follow the screenshots below
General Tab:
- Defaults are great! Click “Add..” and select “Infrastructure” for the next step!
Wireless Profile – Connection Tab:
- Input your Network Name, then click Add.
- Defaults are fine the rest of the way. The last two check boxes may be interesting to you, if so, check them as well (optional).

Wireless Profile – Security Tab:
- Click the Properties Button next to Microsoft: Protected EAP (PEAP)
Microsoft: Protected EAP (PEAP) Properties:
- Trusted Root Certificate Authorities: Check the box of the Root CA that issued your Cisco ISE/RADIUS server EAP certificate.
- If this CA does not appear in this list, it means that the Root CA does not exist in your domain controller’s Trusted Root CA folder (On the DC > MMC > Add/Remove Snap-in > Certificate Management > Local Computer).
- Select Authentication Method: Secured password (EAP-MSCHAP v2)
What’s Next?
In our next installment, we will take a close look at how to deploy wired network 802.1X authentication in a monitoring mode (using Cisco ISE), so that you can test out all your hard work in provisioning the supplicants, that we covered in this blog post, without creating a self-inflicted DoS on the network!


Check out our awesome tech talk on ISE:
Written By: Dominic Zeni, LookingPoint Consulting Services SME - CCIE #26686
If you are interested in LookingPoint installing ISE into your network, feel free to contact us here!

Check out Dominc Zeni's podcast on ISE on the IT in the Bay podcast:
