


Take one look at me and you’ll quickly identify me as someone who loves pi (and pie). Specifically, the Raspberry Pi, they are a permanent accoutrement to my workspaces. With the Pi 4 now officially out what better time to dust off those old Pis and put them to work in your network tool kit. Chances are you already have all the components laying around.
Please join me for the first part of my ‘Adventures with Pi’ blog series. Today’s topic, setting up an open source application suite called ConsolePi on a Raspberry Pi 3B+. While ConsolePi is a feature rich application suite capable of so much, today, we’ll specifically focus on setting up local console access over Bluetooth and wired ethernet with some PushBullet notifications. I’ll highlight some of the other out of box features ConsolePi can support later in this blog.

“Someday, and that day may never come, I will call upon you to do a service for me.”
-Don Vito Corleone (The Godfather)
That indelible quote perfectly captures my relationship with console access. 99% of the time I won’t need it but every so often the need for console access arises. Usually when setting up some new hardware, or recovering a device that can’t be reached through conventional management means. Console access saves the day!
The way things were
Historically if you wanted to connect your computer to the serial console port of a device like a router/switch/firewall (or just about anything else that supports serial console) you would have probably used a USB to Serial adapter connected to your laptop. First connecting the USB side to your laptop and then the RJ45 end into the console port. Then opening the appropriate COM port via your favorite terminal client, and Bob’s your Uncle. Tried and true.
Here’s the rub, you’re physically tethered to the device, often in an uncomfortable environment (those wiring closets get cold and forget about sitting down). For now, we’ll focus on console access, we’ll cover conventional console servers in another blog (stay tuned).
The Future is Now!
There is an easier way! Thanks to the efforts of people far smarter than me we now have a solution. It is worth noting that there are commercially available products on the market which provide the functionality I will be covering. AirConsole is a popular commercial choice and it provides a polished end user experience. What’s the fun in that though? Let’s put our bins of old electronics to good use.
We will be using an open source project found on github by the name of ConsolePi. The author of ConsolePi wanted to take the capabilities of the commercially available products and make them available to the opensource community. The main goal being the ease to implement, and to be supported on most hardware platforms (Raspberry Pi in our case). The author successfully merged a loose collection of open source code from various authors into a suite that simplifies many of the individual configuration steps and wraps it all up in a wizard type of automation approach.
This blog will not cover all features listed below, but if you’re interested in learning more on ConsolePi’s capabilities please visit their github page here.
- Serial Console Server
- Connect to ConsolePi via Telnet/SSH/Bluetooth Multiple Connectivity Options
- AutoHotspot Mode
- Automatic OpenVPN Tunnel
- Automatic PushBullet Notification
Let’s get started! Here’s what we’ll be working with today …
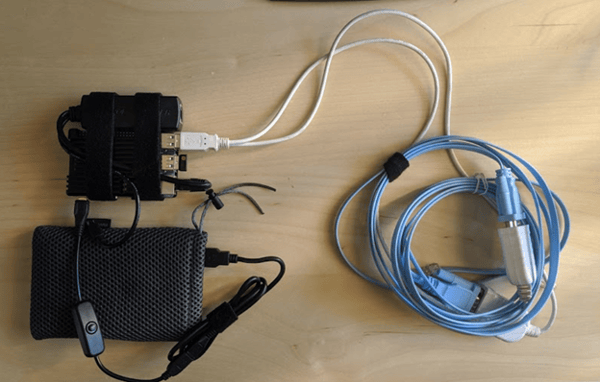
Parts
Pi 3 B+ w/ Case
- 16gig Micro SD
- Power Options – Power Adapter, POE Splitter, or Battery Pack
- Power Adapter (Type you plug into outlet)
- Battery Pack (2.4A output at least for Pi 3B+).
- USB to micro USB cable (short)
- POE Splitter (Optional if you plan to power via PoE)
- HDMI Cable (Only used during Initial Setup)
- SD card reader/writer (my laptop has one built in)
- USB Wireless Keyboard/Mouse (Only used during Initial Setup)
- USB to Serial Adapter and Cisco Console Cable (Pi can support 4 USB devices without USB hub).
Software
- Raspbian OS June 2019 Version - https://www.raspberrypi.org/downloads/raspbian/
- ConsolePi - https://github.com/Pack3tL0ss/ConsolePi
Targeted Milestones for Today
I’ll start by powering my raspberry pi with a battery pack for its power needs. If you’re putting something like this together, you’ll want to be sure to use something that can put out 5V and 2.4A - 2.5A or you might run into problems.
I want this to be compact and easily to fish out of my backpack, and simple to deploy when needed. I want to be able to use Bluetooth from my laptop to connect to the Pi and open Console sessions using the various USB-to-Serial adapters I plan to have connected to the Pi. In addition, I want to be able to SSH to the Pi for management, and to be able to telnet directly to one of the console ports without having to jump use the Pi as a jumpbox (think console server, designated port per serial adapter). ConsolePi also supports the ability to host a local wifi hotspot but that’s for another day.
Summary of Today’s Milestones
- Bluetooth Access from Laptop to console adapters (I’ll be connecting two serial adapters/console cables in this example)
- Connect Pi to network via poe wired ethernet, verify remote access via SSH/telnet/VNC.
STEP 1 – Prepare Raspbian on SD Card and Connect Pi Components.
The first thing you’ll want to do download Raspbian and write to the SD card. If you’re not familiar with how to do this please follow the directions here. Once the SD card is flashed with the Raspbian image insert it into the Pi, connect the HDMI cable to a monitor, and the wireless USB keyboard/mouse dongle. For initial setup you’ll also want to connect the Pi to either wired ethernet with internet (for updates) or with wifi once initially booted. Once everything is connected you should now be ready to boot the pi and begin the initial setup.
*I have a POE Splitter velcro’d to my Pi in case if you’re wondering.*
STEP 2 – Boot Raspbian and Perform Initial Setup. Run ConsolePi auto install script.
With your monitor and keyboard/mouse dongle connected, as well as the wired ethernet (if wifi isn’t available), insert the power cable and wait for the Raspbian desktop to load on the monitor. If prompted the default Raspbian login/password is ‘Pi’ and ‘raspberry’. You should see a desktop with an initial setup box on the screen as show below.
*If you’re using wired ethernet your DHCP assigned IP addresses may be displayed on the first screen, take note for later use. *
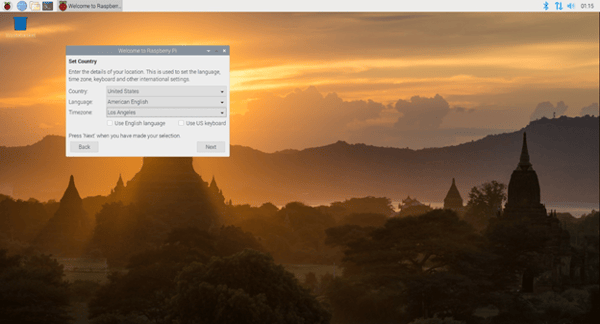
Initial Raspbian Setup
- Choose the Country and language settings and click Next.
- Change the default password on the next screen.
- Pick your SSID to setup wireless (if you don’t intend to connect to the network with ethernet).
- Agree to update and wait for it to complete. Restart the pi when complete. Updating may take some time.
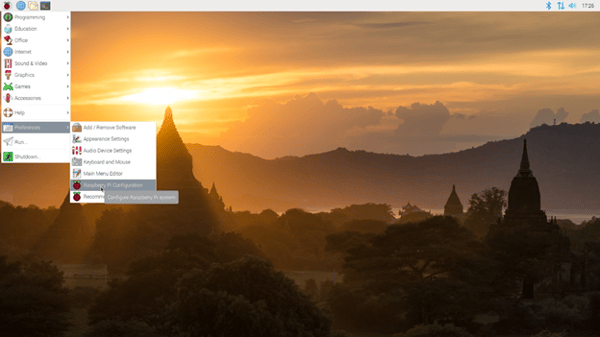
Make the Raspberry Pi Headless (So you don’t have to connect to monitor and keyboard)
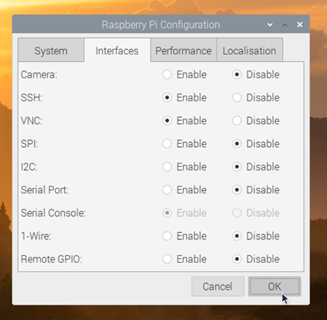
- Click on the Raspberry icon in the top left, then preferences, then click ‘Raspberry Pi Configuration’.
- On the Systems tab, change the hostname if desired, then click ‘Set Resolution’. You’ll need to manually select a resolution for VNC to work properly after reload. Select DMT 82 (1920 x 1080 60Hz)
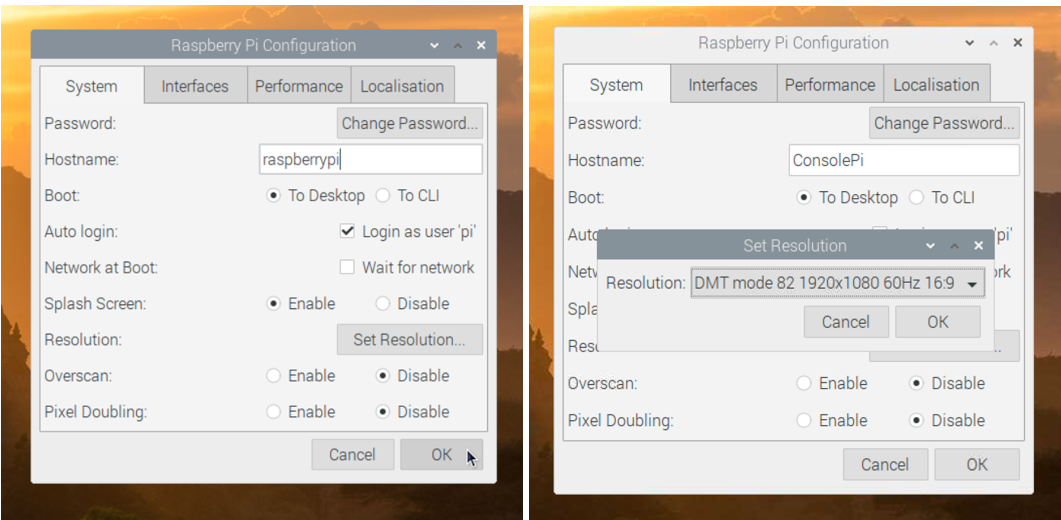
- Next, go to ‘Interfaces’ and Enable SSH and VNC (VNC will provide a remote desktop experience, similar to Microsoft RDP). That should be everything, hit okay and reboot the Pi.
At this point we’ve applied the initial configuration and we will test remote access through SSH and VNC. Once remote access is tested you can boot the Pi without the monitor and keyboard (headless). We will be using SSH to access the Pi’s terminal or VNC if we want a graphical desktop.
Before disconnecting from the Pi (and unplugging the monitor), if you haven’t already determined the IP address assigned to the pi you should run ‘ifconfig’ in a terminal window and note the IP assigned to your interface(s). We’ll need the IP for the next step and this could assist with identifying the IP address DHCP assigned to the Pi (either wired or wireless interfaces).
Verify Remote Access to Pi and Install Console Pi
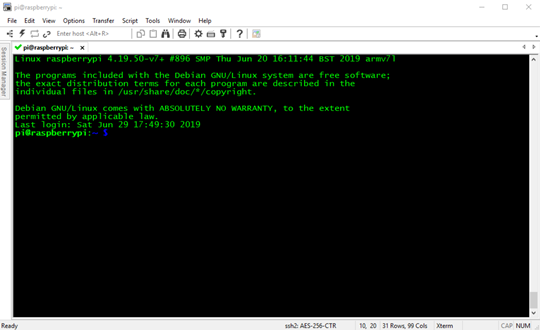
We’ll need to install ConsolePi but first we’ll want to ensure we can reach the Pi to make changes and manage the device when needed. First, you’ll need to find the IP address that was assigned to your Pi through DHCP. The scope of this document will not cover in detail the ways you can find the IP address, but here are some general places you can look; client machine (ifconfig)/DHCP server/logs/ARP. Once you identify the IP of the Pi;
- Verify the Pi is network reachable with a ping from your laptop.
- From your laptop SSH to the IP address of the Pi. You should be prompted to accept the keys and then prompted for login using the ‘Pi’ login and the password you set earlier.
- (Optional) Test remote desktop via VNC. I tested with VNC Viewer and it worked great.
STEP 3 – Run the ConsolePi Auto Install Script.
Run ConsolePi Auto install Script and Setup Guide *Pi will require internet access for this step*
First update/upgrade your Pi if you haven’t already. It’s also a good time to install ‘screen’ as we might need it later.
sudo apt-get update && sudo apt-get upgrade
sudo apt-get install screen
*Press Y when prompted*
The install script below is designed to be essentially turn-key. SSH into the Pi, and paste the following line.
sudo wget -q https://raw.githubusercontent.com/Pack3tL0ss/ConsolePi/master/installer/install.sh -O /tmp/ConsolePi && sudo bash /tmp/ConsolePi && sudo rm -f /tmp/ConsolePi
You should be presented with a screen similar to what is shown below.
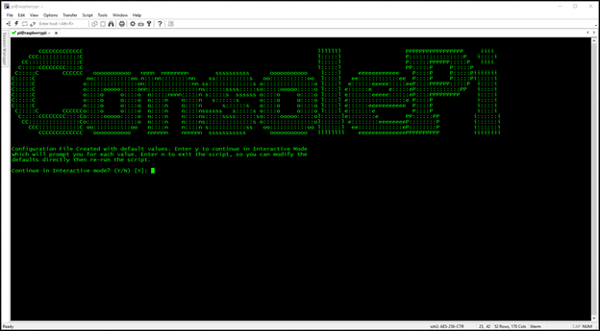
- Press ‘Y’ and enter to continue in Interactive Mode
- If you’re interested in getting Pushbullet notifications when your ConsolePi comes online (which includes it’s IP address) press ‘Y’ and enter. You’ll need a Pushbullet account and the access token to set it up. Otherwise press ‘N’ and enter.
- We will not be setting up Auto-Connect OpenVPN so I pressed ‘N’ and enter when asked.
- I used the default [10.3.0.1] Hotspot IP and SSID name [ConsolePi].
- Say ‘N’ and enter when asked about Cloud Config (Clustering).
When done you should be presented with a summary of your entries, after verifying everything is accurate press ‘Y’ and enter to continue.
- ‘N’ to changing password (we changed it earlier).
- ‘N’ to changing hostname (I had some problems when changing hostname via script, you’re better off changing through the Raspberry Configuration tool discussed earlier (access Pi using VNC).
- Answer ‘Y’ to disabling ipv6 (unless you plan to use).
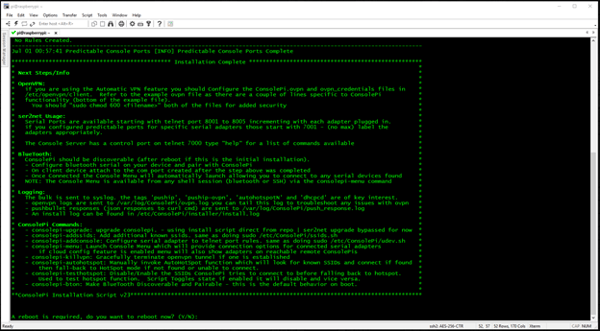
After some time, you’ll be presented with a section pertaining to ‘Predictable Console Ports’. This portion of the wizard has you connect your USB to Serial Adapters one by one so it can learn them. If it’s a supported chipset the adapter will be learned and will then be available as a connection source through the ConsolePi’s menus, regardless of which USB port it gets plugged into in the future.
If you’re unfortunate enough to only have unsupported adapters (like me) there’s still a way to effectively use the adapters you have, albeit in a kludge fashion but workable nonetheless. The author of ConsolePi recommends USB to Serial adapters based on FTDI chips so they properly show up during this step. Here’s the error I ran into (below). It basically says it’s unable to learn the adapter since the adapter chipset doesn’t record a serial field. I’ll still be able to use the adapters, but in my case the specific adapter won’t be tracked and my USB adapters may appear in a different order each time they’re reconnected. I also won’t be able to use the ConsolePi menu options to connect my console sessions once I connect with Bluetooth (more on that later). YMMV depending on the adapters you have.
- Press ‘Y’ when you’re ready to try to connect your adapters.
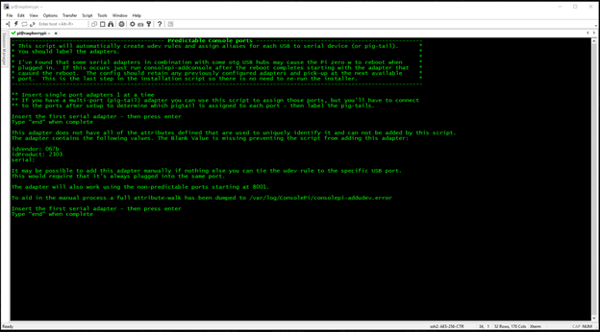
- Follow the on screen instructions to connect your adapters. After you connect your adapters (one at a time) and ConsolePi saves/maps your USB to Serial Adapters you should see a screen with some general details. Copy this page for your records in the event you want to reference some ConsolePi commands. Press ‘Y’ and enter to reboot one last time.
STEP 4 – Connect to the ConsolePi via Bluetooth and open Console Sessions
Bluetooth Pairing and Connection to Pi
After ConsolePi is done rebooting it’s time to test connectivity. My first test will be to pair my laptop to the Pi using Bluetooth, and then to be able to remotely connect to the Pi over Bluetooth and initiate console session out both of the USB to serial adapters I have physically connected to the Pi.
For this test you’ll want to position the ConsolePi near some devices we’ll try to console into. Connect the console cables from the Pi to the various devices you’ll want to access over Bluetooth in this test.
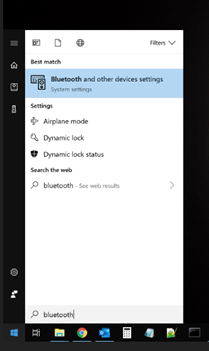
The Pi makes itself discoverable when it first boots. For the initial pairing of the laptop with the Pi you’ll want to navigate to the Bluetooth devices and pair and assign Bluetooth connection to a COM port. To do this;
- On laptop, click start menu in bottom left, and type ‘bluetooth’. Click the ‘Bluetooth and other device settings’ result that pops up.
- Scroll to the bottom and click ‘More Bluetooth Options’.
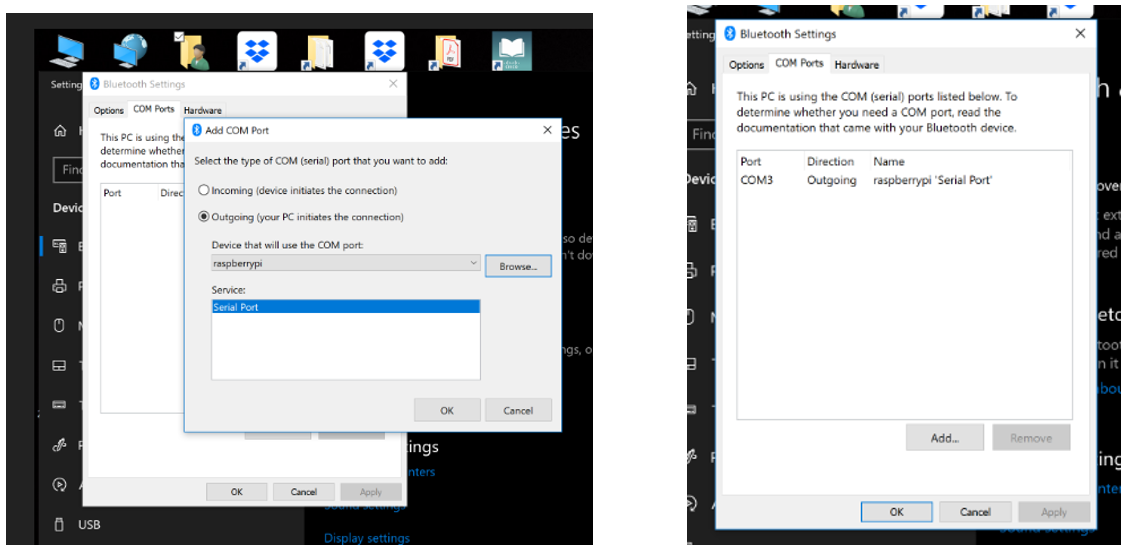
- Select the ‘COM Ports’ Tab. Then click ‘Add’. Select ‘Outgoing’ and from the dropdown select ‘Browse’.
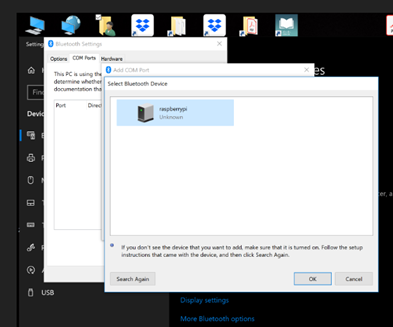
- Your raspberry pi should be listed. Select it and hit ‘OK’. You should now see something similar to ‘Serial Port’ in the Services section. Press ‘OK’ again. Once you are returned to the main screen take note of the COM port you were assigned, you will need it in a minute. Close all open windows and prepare for next step. At this point you’re paired and you’ve assigned that Bluetooth connection to a local COM port.
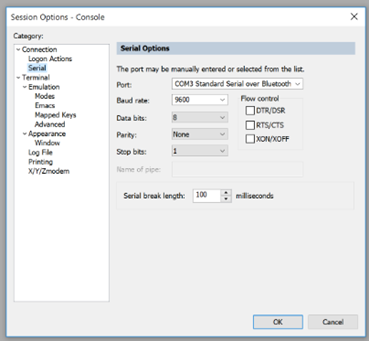
- In your favorite terminal application. Open a session to the COM port you were assigned, 9600baud, 8 data bits, 1 stop bit. You should be presented with the ConsolePi Ascii banner and if you’re lucky the USB adapters were learned and are now presented to you as sources you can connect to immediately after connecting via Bluetooth.
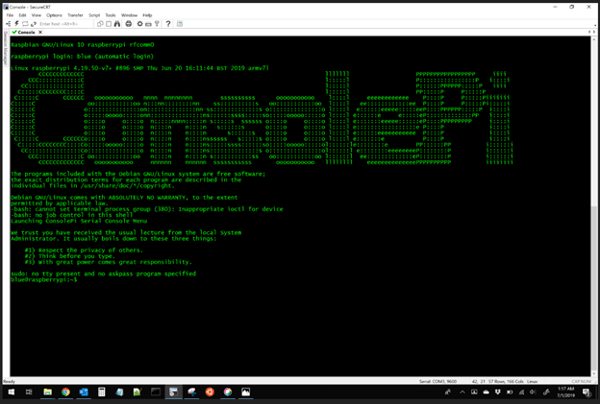
Opening Console Session Once Connected to Pi over Bluetooth (Using ConsolePi Menu)
After you login to the Pi using Laptop COM to Bluetooth mapping, you should be presented with a ConsolePi ASCII banner and a menu listing your available adapters. If your USB adapter was identified by ConsolePi during your initial setup, you should be presented with a list of your adapters. Follow the onscreen instructions and select one, it will open a session out that adapter to whatever device you have the console cable plugged into. You should now see the console screen on the connected device!!

We did it! We are now managing our console devices over Bluetooth!!
Opening Console Session Once Connected to Pi over Bluetooth (Manually)
*THIS SECTION ONLY APPLIES TO THOSE WHOSE USB ADAPTERS WERE NOT RECOGNIZED BY CONSOLEPI*
If you’re like me and your adapters weren’t running the right chipset to be recognized by ConsolePi you’ll have to open the console sessions manually. Like a commoner. We’ll just have to use the venerable linux application ‘screen’ to manage the sessions. It helps being familiar with ‘screens’ keyboard shortcuts. I’ll cover the important ones below.
I’ve talked to the author of ConsolePi and he’s trying to think of ways to better support different chipset based USB Adapters.
- From the Pi’s terminal, type the following to verify your USB adapters are recognized and assigned a tty port. You should see ttyUSB0 if you have single adapter, or ttyUSB0 and ttyUSB1 if you are using two adapters.
lsusb
ls /dev/*USB*
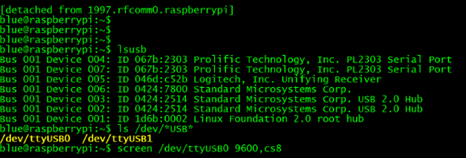
- Launch Console on ttyUSB0.
Screen /dev/ttyUSB0 9600,cs8
You should see the console screen of the device your console cable is plugged into.
When you’re done with that console screen press ‘CNTRL + A + k’ and ‘y’ to kill that screen session.
Or if you want to hop into another device in a separate screen session; Press ‘CNTRL + A + D’. This minimizes or detaches the screen you’re working on so you can start another session.
Launch Console on ttyUSB1.
Screen /dev/ttyUSB1 9600,cs8
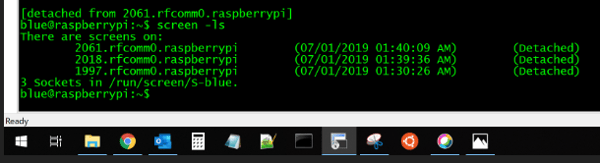
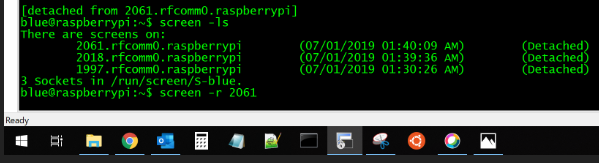
Now let’s minimize ttyUSB1 screen and go back to ttyUSB0. To do this press ‘CNTRL + A + D’ (this detaches the USB1 screen). Once back at the terminal prompt, type ‘screen -ls’ to see the available screen sessions. To resume one or the other use the command below but replace the session #.
Screen -ls
Screen -r 2061

Remember, When you’re done with that console screen press ‘CNTRL + A + k’ and ‘y’ to kill that screen session.
Fantastic! I can now be sitting comfortably at a cube near the wiring closet and access the console port of up to 4 devices over Bluetooth. Not too shabby. Now let’s try some basic console server type function.
STEP 5 – Telnet to Specific Port on Pi to be Connected to Serial Adapter
Console Server Telnet Access
For the next test I will telnet directly to the console session. This will require the Pi to be on the network and reachable (either over wired or wireless). This is done by utilizing a telnet port specifically mapped to one of the USB to Serial Adapters. Ser2net is the application responsible for mapping specific ports to the USB adapters.
In my case, my network adapters weren’t ‘learned’ by ConsolePi so I will be using the default port range of 8001 and up to connect. It should work right out of the box but if you ever need to see the Ser2net configuration you would access by SSH’ing to the Pi and editing the /etc/ser2net.conf file.

My adapters will be using the ‘unknown devices’ settings. Let’s test it out!

- From your network connected laptop, open a telnet session to the Pi’s IP address on port 8001.
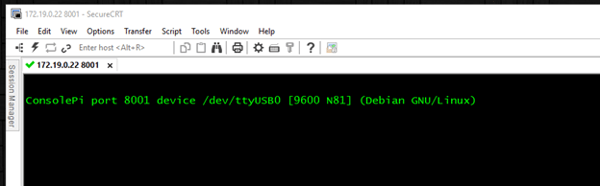
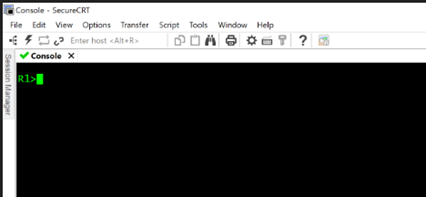
- Press Enter after seeing the initial connection message. We should now see the console prompt!
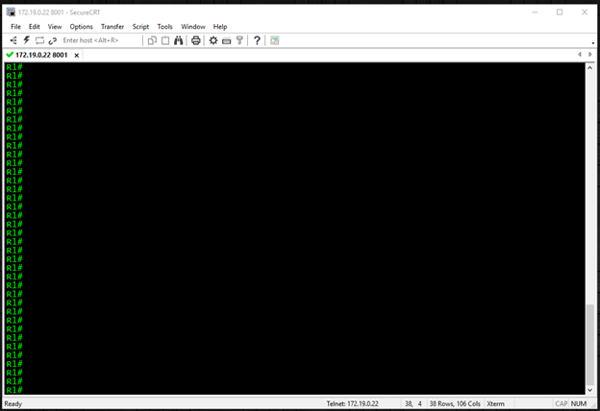
Let’s try telnet to port 8002 next.
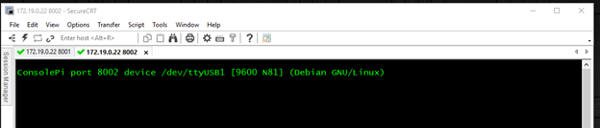
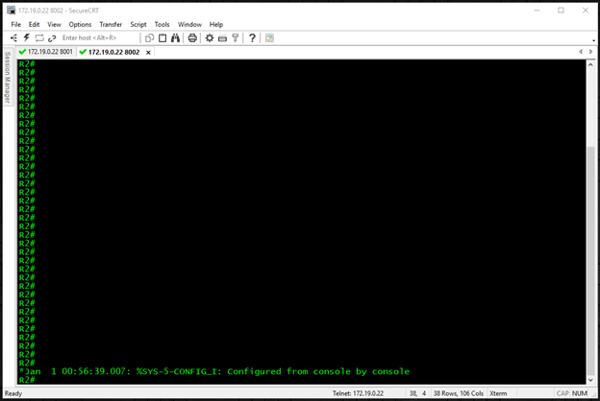
Success! We’ve successfully initiated telnet session to the Pi on a specific port and we were re-directed to the console port of the device we’re trying to manage!
Conclusion – Closing Thoughts
We’ve tested remotely connecting to the Pi over Bluetooth and then managing connected devices over console sessions (similar to a jumpbox). We’ve also tested direct remote access to Pi when it’s connected to the network using the wired/wireless IP address and the specified telnet port. The only extra hardware I will have to include in my backpack is the raspberry Pi but now when the need arises for onsite console access I can simply fire up the Pi and connect through various means to access the console port of the connected devices.
I hope this has been informative and I thank you for reading! Please stay tuned for the second installment of Adventures with Pi. The next entry will cover building a light weight pi based console server.
Written By: Michael Lorincz, LookingPoint Network Engineer
If you are interested in LookingPoint managing into your network, feel free to contact us here!

Also if you haven't heard, WE STARTED A PODCAST! Check it out here, its called IT in the Bay!