


Today we’ll be going over how to add a Cisco switch to ISE 3.0 for TACACS administration. For this configuration you’ll need an ISE PSN (Policy Service Node) node with Device Admin Services enabled and either a Cisco switch or router running IOS.
Services
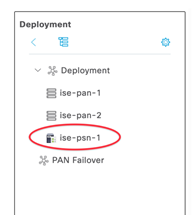
First things first, let’s make sure Device Admin Services is enabled on our ISE nodes. You’ll want to navigate to Administration > Deployment in the ISE 3.0 menu. From there select the node you want to enable the service on in the left-hand menu
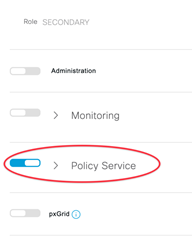
This should then load the General Settings tab on the right-hand side. Scroll down to Policy Service. This should be selected first before we can enable Device Admin Services.
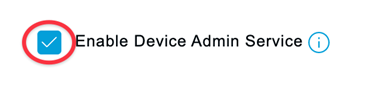
Under the dropdown for Policy Service check the box next to Enable Device Admin Service. Repeat for all nodes that will be assigned as a TACACS server.
Network Device Groups
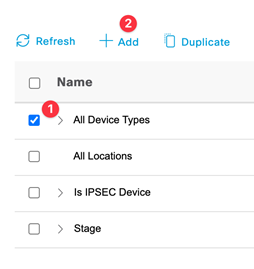
Now that we have the service enabled on all ISE PSN’s, let move on the network devices. Each device that you want to administer via TACACS will first need to be added to ISE. We’ll start off by adding different device types to ISE. This will help later in our policy sets to differentiate between different devices (Note: you could also do this via different operating systems as well) Navigate to Administration > Network Device Groups. Since these will be device types, we’ll want to add them under All Device Types. Select the box to the left and then click add above.
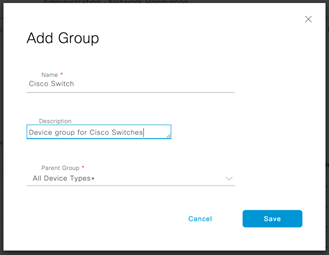
This should pop a window asking to Add Group. Fill one out for each Device Type that you would like to add. For this exercise we’ll be adding two; Cisco Switch and Cisco Router. See example below.
Network Devices
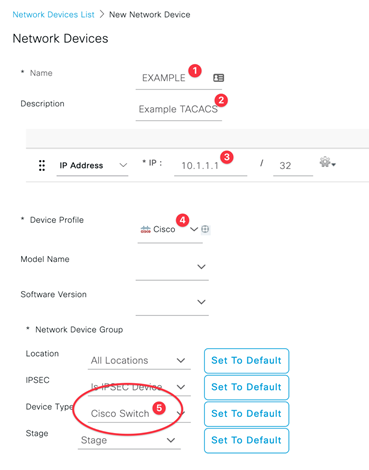
Next, we can navigate to Administration > Network Devices. Here we’ll be adding each device that we want TACACS to administer. Click add and we’ll insert our first device. Fill out all the fields with an asterisk next to them. Pay attention to the Network Device Group section, we’ll be selecting the device type that we created in the above step (See step 5 in the below image).
Scroll down to the TACACS Authentication Settings section. Start by clicking the left checkbox to enable and then select the dropdown to enter the TACACS settings.
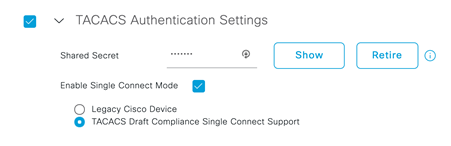
Fill out a Shared Secret to be used by the network device when it authenticates a username password to ISE.
Next select Enable Single Connect Mode and the underlying Single Connect Support.
Note, we enable Single Connect Support to optimize the number of TCP connections to each device.
TACACS Profiles and TACACS Command Sets
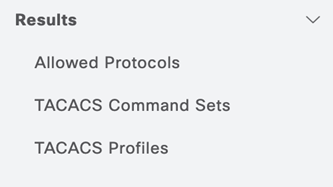
Now we’ll move on to our TACACS Profiles and Command Sets. Let’s start with the profiles first. Navigate to Work Centers > Policy Elements. On the left-hand side select Results and click the dropdown arrow. This should bring up a menu that show the following:
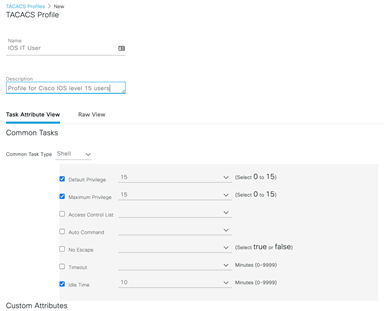
Let’s select TACACS Profiles and then Add. We’ll begin by giving users with this profile a privilege level of 15, however we’ll be restricting the commands each user can enter in the later step. (Note: show run in IOS requires a privilege of level 15). Fill out the remaining items like the example:
We’ll move on to TACACS Command Sets next. For this example, we’ll be creating two (Note: a default DenyAllCommands should already be configured). Start with the first Permit All. Click Add from the top menu and fill out as below:
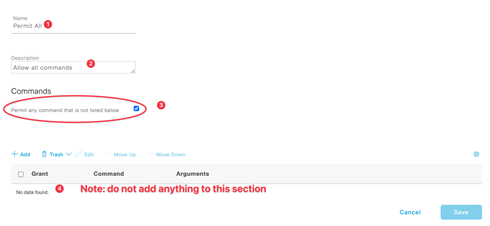
For the Permit All command set, we want to pay attention to the Permit any command that is not listed below check box.
Click Save to finish.
Next let’s make a command set for Show Only commands. Click Add again from the top menu. Fill out as below:
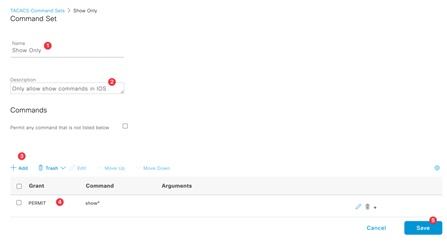
For this command set, we’ll be specifying what commands are allowed (See step 3 above example). You’ll need to select Add from the menu and fill out the information listed in step 4 in the above example. (Note: the command has an asterisk following the word show. This is a wildcard for all show commands).
Click Save to finish.
Device Admin Policy Sets
Now that our devices are in ISE and we have our profile and commands configured, we’ll move out to our Policy Sets for device administration. Start by navigating to Work Centers > Device Administration > Device Admin Policy Sets. We’ll be creating a new Policy Set here rather than altering the Default one. Click the add icon on the left side to begin, this should insert in a new row.
Start by filling out the Policy Set Name and Description.

Then select the plus icon (see step 3 in the example above). This should bring up the Conditions Studio. Here we’ll be matching device types that we created in the very beginning.
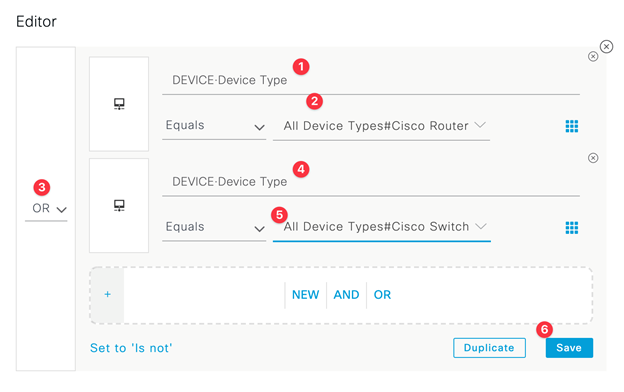
Pay attention that your condition is set to OR (See step 3 in the above example). This condition should match on the following: If Device Type is a Cisco Router or if Device Type is Cisco Switch. Click Save to finish.
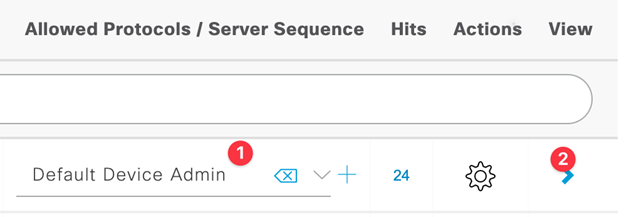
Next verify that Default Device Admin is select in Allowed Protocols/Server Sequence. Then select left-hand arrow under View to open the Authentication & Authorization Policy section.
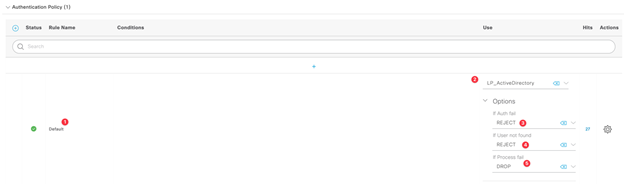
Here we’ll be confirming that users are who they say they are (Authentication) and then we’ll give those users permission to access a resource (Authorization).
For our Authentication Policy we use Active Directory as an External Identity Source. Configuring AD in ISE is out of the scope of this example, however, you can check out this blog as a guide: https://www.lookingpoint.com/blog/cisco-ise-active-directory.
For reference this step should look something like this:
Now that we know that users are who they say they are, let’s move on to authorizing them for different command sets based on which group they are in within Active Directory. For this example, we’ll have two users. One user will be in Operations AD Group and can issue show commands, and the other user will be in Admin AD Group and will be permitted to use all commands.
We’ll start with the Operations group. Under Authorization Policy select the add button to insert a new row above the default row.
Fill out the name of this policy and then select add under the Conditions column (see step 2 below).

This should open the editor up. Here we want to match users in Active Directory that are a part of a certain group, i.e., Domain Users group.
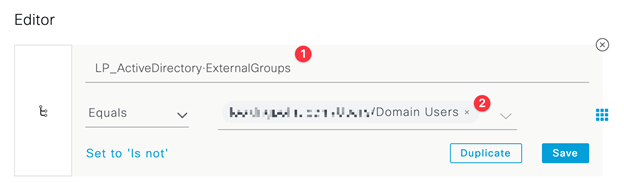
Click Save and add this condition to the Conditions Library (Note: I saved my condition as TACACS LAB RO in this example).
Now we want to assign a command set and shell to users that match this group. Proceed to update the Authorization Policy with the following:

Now we want to repeat the above steps for Admin group.

Step 2 from the above will again open the editor. Here we want to match a different AD group, i.e., Domain Admins group.
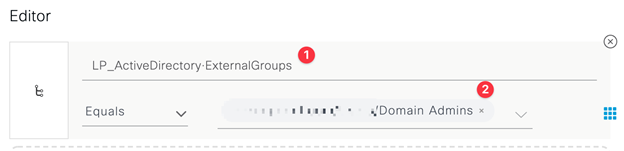
Click Save and add this condition to the Conditions Library (Note: I saved my condition as TACACS LAB RW in this example).
Lastly update the Command Sets (step 1 below) and Shell Profiles (step 2 below) for the Admin group and select Save to complete the Authorization Policy for this Policy Set.

Cisco IOS Configuration
Now we can move on to the IOS portion! Note: fill out the correct key to match the pre-shared key you entered under the Network Device settings.
aaa new-model
tacacs server ise1
address ipv4 10.1.1.1
key xxxxxx
tacacs server ise2
address ipv4 10.1.1.2
key xxxxxx
aaa group server tacacs+ ISE-TACACS-GROUP
server name ise1
server name ise2
ip tacacs source-interface vlan 2
aaa authentication login TACACS-ISE group ISE-TACACS-GROUP local
aaa authorization exec TACACS-ISE group ISE-TACACS-GROUP local
aaa authorization config-commands
aaa authorization commands 0 TACACS-ISE group ISE-TACACS-GROUP local
aaa authorization commands 1 TACACS-ISE group ISE-TACACS-GROUP local
aaa authorization commands 7 TACACS-ISE group ISE-TACACS-GROUP local
aaa authorization commands 15 TACACS-ISE group ISE-TACACS-GROUP local
aaa accounting exec default start-stop group TACACS-ISE
aaa accounting commands 0 default start-stop group TACACS-ISE
aaa accounting commands 1 default start-stop group TACACS-ISE
aaa accounting commands 7 default start-stop group TACACS-ISE
aaa accounting commands 15 default start-stop group TACACS-ISE
line vty 0 15
login authentication TACACS-ISE
authorization exec TACACS-ISE
authorization commands 0 TACACS-ISE
authorization commands 1 TACACS-ISE
authorization commands 7 TACACS-ISE
authorization commands 15 TACACS-ISE
transport input ssh
end
Verification
You can use ISE live logs for verification. Navigate to Operations > TACACS > Live Logs to view.
A successful Authentication should look like the following:

You should have a checkbox next to status (see step 1 above) as well type Authentication (step 3) and a matched Authentication Policy (step 4).

Likewise, a successful Authorization connection should look like the above. You should have a checkbox next to status (see step 1 above) as well type Authorization (step 2) and a matched Authorization Policy (step3).
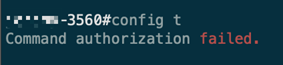
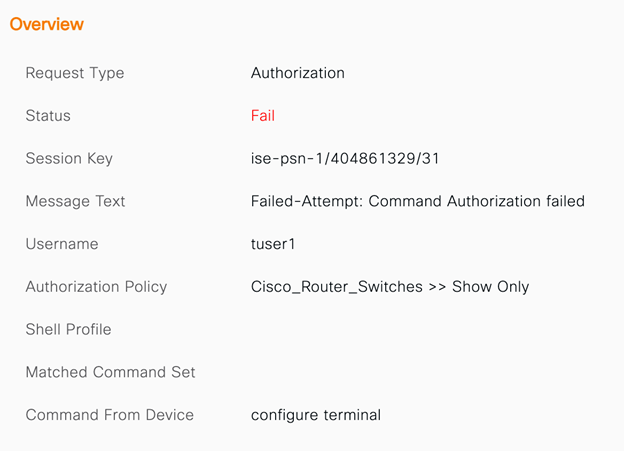
You may also see failures in the Live Logs for different Authorization requests. This could be the result of users with show only commands trying to issue unauthorized commands.
If you are interested in LookingPoint installing ISE into your network, feel free to contact us here!

Jeremy Worden, Senior Unified Communications Engineer