


Using DNA Center (Catalyst Center) LAN Automation to make your life easier.
I am currently deploying an SD-Access fabric using Cisco's DNA Center, now rebranded as Catalyst Center. As part of this project we used the LAN automation process to build the network to all of the access switches. We had about 15 different switches in 15 different IDFs so using this process made quick work of discovering the switches, ingesting them into DNA Center, then provisioning them with all the necessary routing for the fabric underlay. Note that you don't need to be deploying the SD-Access fabric for LAN automation to be useful, if you are deploying a routed at the edge traditional network design, LAN automation can be used as well.
The Design
Speaking of the design, lets backup and talk about the design. For SD-Access the connections between each of the edge switches (shown as Fabric Edge, FE) and the centralized distribution switches (Shown as Border Node, BN) use layer 3 links for the underlay network. Each access switch has its own layer 2 domain and has a routing protocol to route traffic between the fabric edge switches and the border nodes. The fabric networks are then built on top of these routed connections, but for the sake of this blog anything dealing with the fabric itself is not applicable.
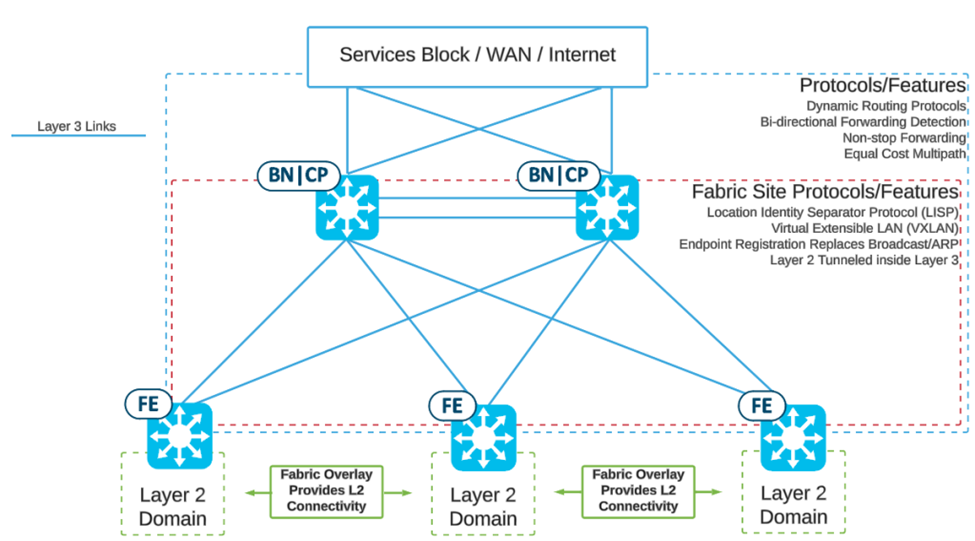
Cisco's preferred routing protocol between the FE and BN switches is IS-IS. Because of this LAN Automation will automatically configure IS-IS as the routing protocol between the Edge nodes and the Border nodes.
LAN Automation Overview
So now lets talk about what LAN Automation is. LAN Automation is the process of quickly discovering and provisioning access switches into DNA Center using a zero-touch deployment model. For SD-Access Fabrics, LAN automation accelerates building the underlay network without the traditional network planning and implementation process.
LAN automation requires configuring the switchports on seed switches for LAN automation in DNA Center. Any Catalyst 9k switches connected to these switchports will be discovered and provisioned using the LAN automation template. In our instance the Border Node switches will be our seed devices and we will use LAN Automation to discover the Fabric Edge switches.
NOTE: For LAN Automation to work properly, the access switches must be in ZTP mode. A switch is in ZTP mode if the console prompt is displaying this message:
Please answer 'yes' or 'no'.
Would you like to enter the initial configuration dialog? [yes/no]:
Pre-Provisioning Prerequisites
Before being able to discover any switches, there is a check list of configuration prerequisites that must be completed in DNA Center.

The first three prerequisites are also required for manual device provisioning, so should be already completed during the manual device discovery and provisioning process for the Border Node switches. If you have done any work in DNA Center you are probably familiar with these settings as these are usually step one for any DNA Center work. We will just go over the briefly.
- Creating the Network Hierarchy defines the physical location, including building and floor information. This information is added by navigating to the Design > Network Hierarchy page.
- Defining Network Settings defines the various shared network services such as the ISE server IPs, DHCP, DNS and NTP servers. This information is added by navigating to the Design > Network Settings > Network page.
- Define Device Credentials defines the credentials used by DNAC for SSH, SNMP, and NetConf to manage the devices once provisioned. This information is added by navigating to the Design > Network Settings > Device Credentials page.
LAN automation configures the discovered switches with a loopback address for management (one /32 host route) and two point to point links (two /30 routes), one to each of the seed devices. These subnets are carved out of a larger address pool configured in prerequisites 4 and 5.
- Define IP address pool at Global level may already be defined as either a large supernet, or site summaries in DNAC. This pool is used as a supernet for all sites to carve out their specific IP pools. To configure or verify this pool still exists navigate to the Design > Network Settings > IP Address Pools page and click the Global dropdown on menu in the left margin. To configure the global pool click the add button and use the following settings:
Pool Name: The name of the global pool
Type: Generic
CIDR: Supernet address in CIDR notation
Gateway: None
- Reserve IP Address Pool at Site-Specific level defines the IP pool used by LAN automation for each of the three routes talked about earlier. The size of this pool should be calculated based on the total number of subnets that need to be carved out for all Fabric Edge switches. To create a new LAN automation pool, navigate to the Design > Network Settings > IP Address Pools page and click the site configured in step 1 in the dropdown on menu in the left margin. Click the reserve button and use the following settings:
Pool Name: <Site-name>_LAN_Automation
Type: LAN
Global Pool: Choose the Global IP Pool
Prefix Length: Calculated prefix length for the three subnets for all switches to be discovered
Subnet: The subnet for the pool
Gateway: None
Define DHCP and DNS servers
The last Prerequisite is to discover and provision the seed devices using the manual discovery process. The seed devices are the two Border Node switches. Manual discovery is beyond the scope of this LAN automation blog.
Starting LAN Automation
Once all the prerequisites have been configured it is time to start the LAN automation process. Navigate to Provision > Network Devices > LAN Automation in DNAC. In the upper left corner of the page, click “Start LAN Automation”.
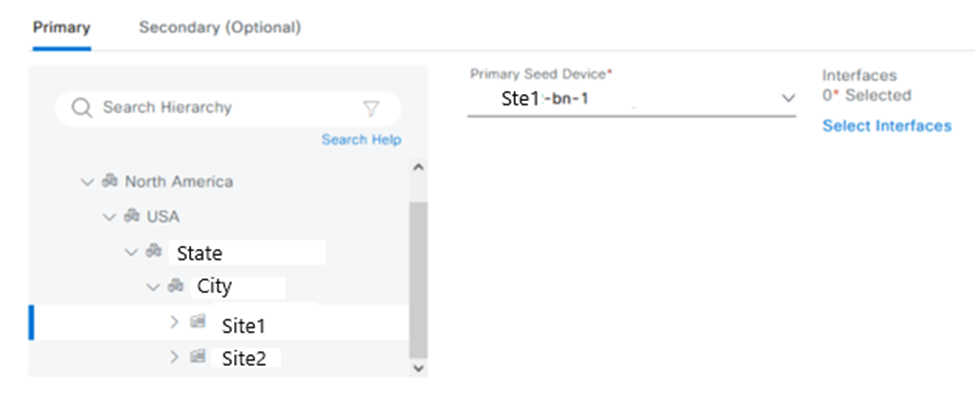
In the LAN Automation workflow you first must select the seed devices used to connect the access switches. First choose the site where the seed devices is assigned to using the network hierarchy on the left, then choose the correct seed device:
Next click on “Select Interfaces” link next to the seed device to open the interfaces dialog box. Select which interfaces the access switches that we want discovered are plugged into by clicking on the + next to the interface in the left column:
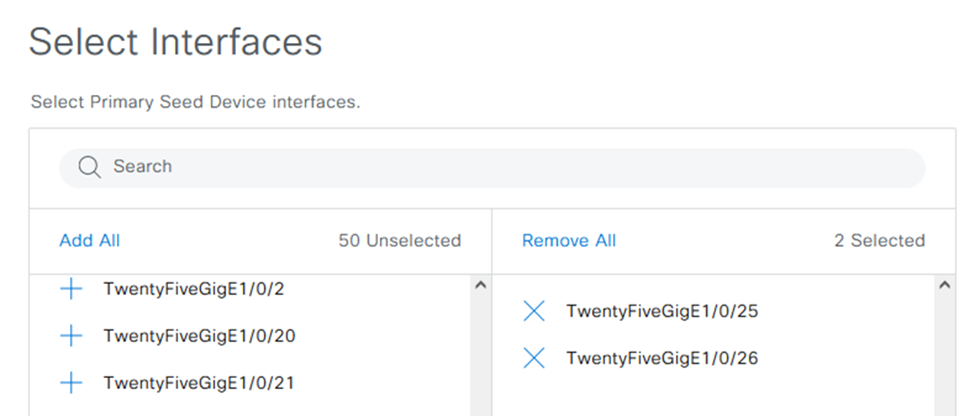
You can remove interfaces selected by accident by clicking the X in the right column. Click Select to close out this dialog box. Back in the LAN Automation workflow page click on the tab for Secondary (optional) and in the same way we choose the primary seed device select the secondary seed device.
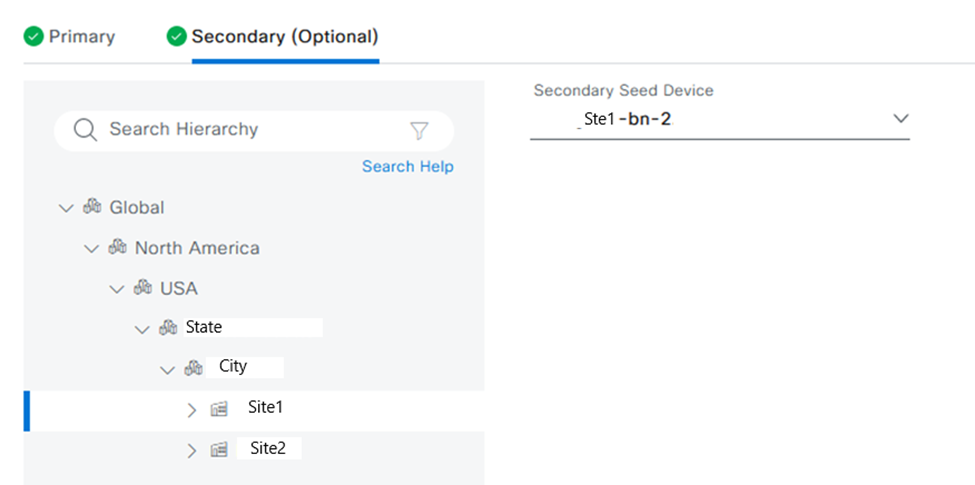
NOTE: For LAN Automation to work properly, the access switches must be connected to the same interfaces on the Primary and Secondary seed devices. DNA Center assumes the interfaces selected for the Primary seed are the same interfaces selected for the Secondary seed.
Click next to go to the next page.
On the next page, select the site in the Network Hierarchy and select the LAN_Automation pool that was configured as part of the prerequisites. Click the “Advanced Attributes” slider and check the “Enable Multicast” and “Advertise LAN Automation Routes into BGP” check boxes. These will enable multicast on the underlay and advertise the LAN Automation routes into BGP for management purposes.
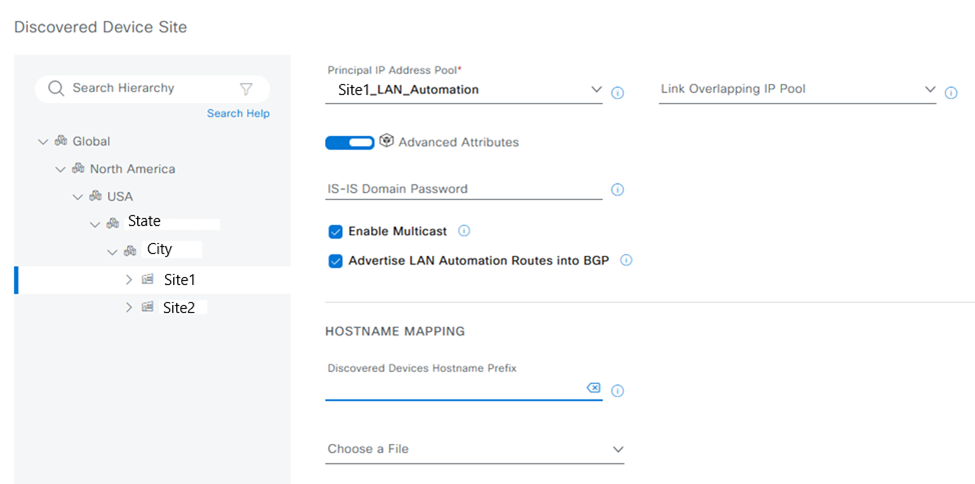
Finally, under Hostname Mapping, either add a hostname prefix (like shown above) or download the sample csv and upload a hostname to serial number mapping. Note that the Prefix method will add a number starting with 1 and go sequentially as devices are discovered. There is a custom template for renaming the hostname during provisioning if the prefix method is chosen.
For the life of me, every time I tried to use the CSV method, DNA Center wouldn't recognize the file. For this project I used the Prefix method, but then created a custom provisioning template to rename the switch. If you can get the CSV method to work then you shouldn't have to rename the switches.
Click Review to see the review page and then start the LAN automation. The Automation process can take anywhere from 30 mins to 2 hours depending on the number of devices being discovered, so go grab some lunch or something. This process can be monitored from the LAN Automation homepage, or by searching for the task.
Once LAN Automation is complete you should disable the job, as it will keep running if you don't manually disable the job back at the LAN automation dashboard page. You should see the edge switches show up in the device inventory page, allowing you to do any other workflow in DNA Center the same as any other device.
Hopefully now you can see how LAN Automation can really save you time when deploying a bunch of access switches. If you need additional help with your DNA Center deployment don’t hesitate to reach out to us here at LookingPoint at sales@lookingpoint.com!

Trevor Butler, Network Architect