If you aren’t already using file checksums, why not? It’s a REALLY good idea for any file you download over the internet. It could also be a good idea for a file you may want to ensure stays unchanged on your own network. File checksums are a vital tool for ensuring the integrity and authenticity of files. They serve as digital fingerprints, allowing you to verify whether a file has been tampered with or corrupted during transmission or storage. In this guide, we’ll learn about file checksums and how to use them, and I'll include an example to illustrate the process.
What is a File Checksum?
A file checksum is a fixed-length string of characters generated from the contents of a file using a specific algorithm, such as MD5, SHA-1, or SHA-256 to list a few. This checksum serves as a unique identifier for the file's content. Even a tiny change in the file, like a single character modification, will result in a vastly different checksum.
Why Use File Checksums?
Data Integrity: File checksums help ensure that files remain intact and unaltered. If a file's checksum matches the expected value, you can be reasonably certain that the file is unchanged.
Data Authenticity: Checksums also aid in verifying the authenticity of files. You can confirm that a file has not been tampered with or replaced by a malicious version.
Error Detection: Checksums are useful for detecting errors in data transmission. If a file arrives with a different checksum than expected, you know that something went wrong during the transfer.
Now, let's delve into how to efficiently use file checksums:
Step 1: Choosing a Checksum Algorithm
The first step is to select an appropriate checksum algorithm. While MD5 and SHA-1 were once popular choices, it's recommended to use more secure options like SHA-256 or SHA-3, which are resistant to collision attacks. In most cases, the owner of the file chooses which algorithm to use and provide for comparison, and we’re just going to match it. Here's a comparison of some available algorithms:
MD5: Fast but weak. Not recommended for security-critical applications.
SHA-1: Weak for security purposes, but still stronger than MD5.
SHA-2 (224, 256, 384, & 512-bit): Considered secure for most applications due to its strength and widespread adoption.
SHA-3: The most recent and secure option, recommended for high-security scenarios, but can take longer to run in software (although it’s faster in hardware)
Step 2: Calculating the Checksum
To calculate a file's checksum, you'll need a checksum calculator tool. Many command-line and graphical tools are available, such as certutil on Windows, and md5 or shasum on Mac.
Open your checksum tool.
Select the file you want to checksum.
Choose the desired checksum algorithm.
Click "Calculate" or run the command.
Step 3: Verifying File Integrity
When you need to verify a file's integrity, follow these steps:
Retrieve the stored checksum.
Recalculate the checksum of the file you want to check.
Compare the two checksums. If they match, the file is unchanged.
Step 4: Handling Mismatches
If the checksums don't match, it's likely an indication of file corruption or tampering. In such cases, consider re-downloading or restoring the file from a backup or finding another source for downloading the file.
EXAMPLE:
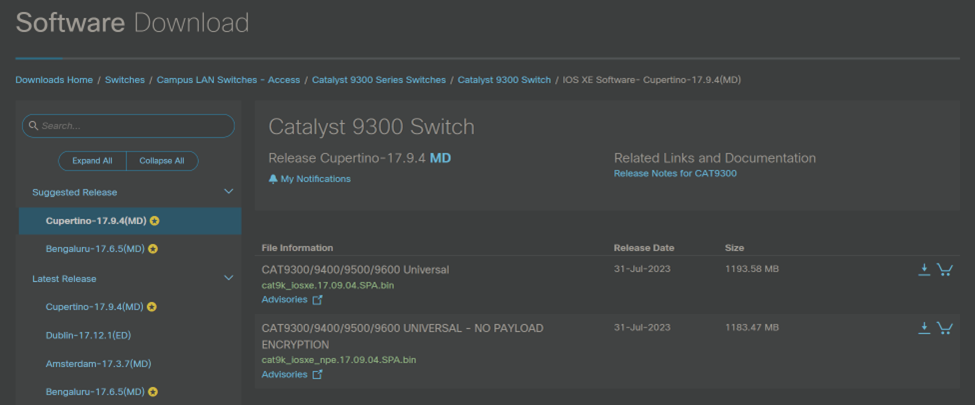
Let’s download the latest version of IOS XE for a switch and verify that it’s good.

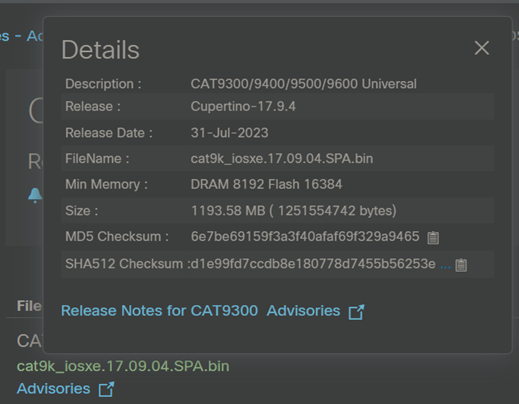
From the download page, I can mouse over the green filename to see the details below which show both an MD5 & a SHA512 Checksum with a little clipboard icon on the right to copy the checksum.

For this example, I’m using Windows. I’m going to select SHA512 since it’s more secure.
Copy the SHA512 checksum from Cisco’s site and paste it into a text file in my downloads folder – ensure there are no leading or trailing spaces (I called mine checksumSHA512.txt)
Download the .bin file to my downloads folder
Open the windows command line (I hit windows key+r, then type cmd)
Run the built-in command certutil to copy the output to another text file (on a Mac, you could use shasum):
certutil -hashfile cat9k_iosxe.17.09.04.SPA.bin SHA512 | findstr /V ":" > localcheck.txt
Let’s break this command down…
certutil -hashfile cat9k_iosxe.17.09.04.SPA.bin SHA512 <- This part of the command uses the certutil to get a SHA512 hash from the file we just downloaded (I used tab-completion in the command line for the file name)

| findstr /V “:” <- This part of the command will find & exclude any lines with a colon : in them so we’re only left with the hash itself

> localcheck.txt <- This part of the command defines a text file to write my hash into
Finally, let’s compare using the built in fc command (on a Mac you can use the diff command):
fc /n localcheck.txt checksumSHA512.txt

Ideally, we’d see “no differences encountered” as above, but below is what a failure looks like (I added a trailing space to one of the files)

Conclusion
File checksums are a huge safety measure for ensuring data integrity and authenticity. Whether you're a network administrator, system administrator, software developer, or an everyday computer user, understanding and using file checksums can save you from potential data disasters especially in this day and age of trojan horse files and disguised malware. If you’re like me and you find links to downloads from message boards or online articles, try to only download files that have a checksum provided by a reliable developer and take an extra couple minutes to ensure you get what you’re expecting and avert potential disaster.
LookingPoint offers multiple IT services if you’re interested. Want more information, give us a call! Please reach out to us at sales@lookingpoint.com and we’ll be happy to help!
Ryan Alibrando, Managed Services Team Lead


