


This entry in our Cisco ISE blog series expands on the previous entries, the first of which can be found here: Authenticate all the things!. Some of the vernacular we established in those entries will be repeated here, but not explained. So, if you haven’t had a chance to read the series yet, go ahead, we’ll wait right here for you! In this entry, we will take a deep dive look at the first phase of a wired 802.1X deployment; Monitor Mode!
Ok Fancy Pants…What is Monitor Mode?
I’m glad you asked. You will recall from our previous blog entry, Native 802.1X EAP Supplicant Provisioning, that we successfully provisioned our wired endpoint 802.1X supplicants to authenticate to the network. Err…wait…did we? Did it work? Did we miss anything on the configuration? Did we miss any endpoints entirely? What if I provision the network for 802.1X and nothing can connect to the network? I love my job!! How do I secure the wired network AND keep my job!?
Enter 802.1X monitor mode. Monitor mode allows us to complete an end to end (supplicant -> authenticator -> authentication server -> identity store) configuration of 802.1X wired network authentication and remove all the FUD (fear, uncertainty, and doubt) from the equation. Using a couple special commands on the authenticator switch ports, we can ensure that network access services are not impacted while we validate our end to end wired 802.1X configuration. In monitor mode, the endpoint is granted access to the network regardless of whether they pass or fail their authentication request (and you will still have a job!!!). Fantastic!
Monitor Mode
There are a couple things to know right off the bat about monitor mode.
- It is mutually exclusive from supplicant provisioning. Ideally you will have already completed your supplicant provisioning, however, it is not required. This means you can enable monitor mode in parallel to, or before, or after your supplicant provisioning efforts.
- It is important not to return any advanced authorization results from the RADIUS authentication server. We simply want the authentication server to send back a RADIUS access accept or access reject. Monitor mode is for validating that our supplicants 802.1X authentication is successful. It is not for validating the enforcement of more advanced authorization results such as Scalable Group Tags (SGT’s), Scalable Group ACL’s (SGACL’s), downloadable ACL’s (DACL’s), or even dynamic VLAN assignment. You can still create your fine-grained authorization rules on ISE so that you can validate AD group membership matching, device profile matching, etc. The important thing is that you only return a basic RADIUS access accept or access reject from ISE to the authenticator (access switch). When you move into the next mode of your deployment, low-impact or closed mode, you can return and test the advanced authorization results.
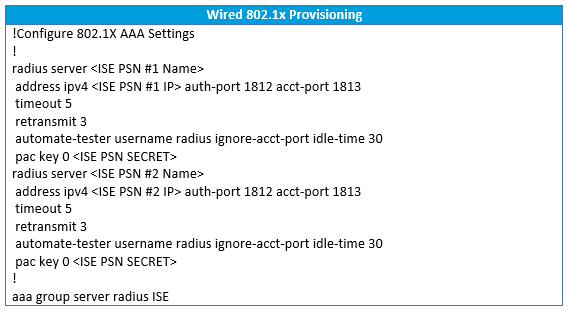
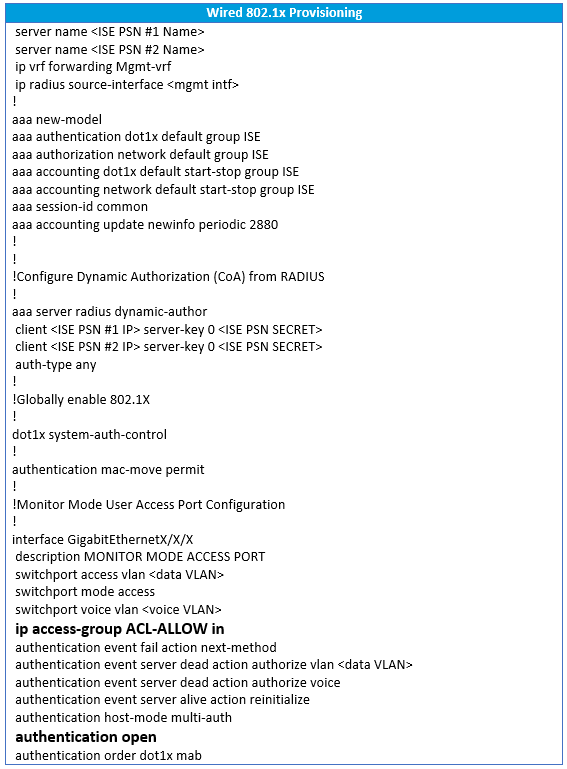
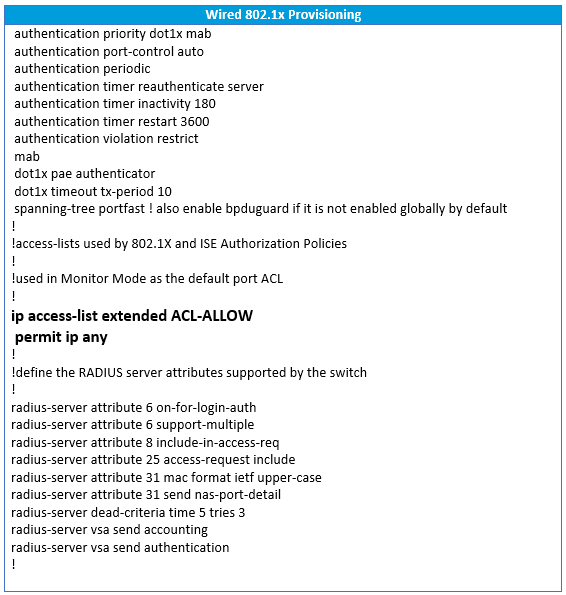
Authenticator (Access Switch) Configuration
Here below is a common configuration template we use at LookingPoint during our wired 802.1X monitor mode phase. This configuration was built using the great reference documentation provided by Cisco. I won’t attempt to explain each command in detail, however there are inline comments in the below configuration that will give an overview of what a given snippet of configuration accomplishes. In the configuration you will find two commands in bold on the access port configuration; ip access-group ACL-ALLOW in and authentication open. These two commands are the magic behind the monitor mode behavior. In our example ACL-ALLOW is set to permit all IP traffic. A layer three ACL applied to a layer two switchport? Yes! This is known as the port ACL, or PACL. The authentication open command enables the Pre-Authentication Open Access feature on the switch port. With this feature enabled, anything matching the PACL is permitted regardless of the 802.1X authentication state. Since our monitor mode PACL permits all IP traffic, network access is uninterrupted even if authentication fails. Magic!
Authentication Server (Cisco ISE) Policy
We are not going to get into the nitty gritty details of ISE yet, but here we will provide you with some best practices we follow in Cisco ISE when deploying a wired 802.1X monitor mode policy. These are not step by step instructions.
- Policy Sets - Ensure “policy sets” are enabled. Policy sets allow you to create policies specific to use cases (wired, wireless, VPN, etc.) versus one monolithic policy for all use cases. Policy sets have a major benefit of limiting the scope of impact for ongoing policy configuration changes as well as making each policies intent clear and concise. Each policy set contains its own authentication and authorization rule set. When we deploy wired 802.1X in monitor mode, we always use a unique policy set for it. How does ISE know to use a particular policy set when it receives a RADIUS request? The policy sets have entry conditions associated to them. Policy sets are presented as a top-down ordered list and the first policy set entry condition that is matched, is selected to service the RADIUS request. The entry condition for the monitor mode policy set can vary by deployment, however our best practice is to create a new NAD attribute called “Deployment Stage” and set one of the values of that attribute to “Monitor Mode”. Next, on a per NAD (access switch) basis we define the “Deployment Stage” attribute as “Monitor Mode”. Finally, our policy set entry condition can read like this: if “Deployment Stage” is equal to “Monitor Mode”, enter the monitor mode policy set.


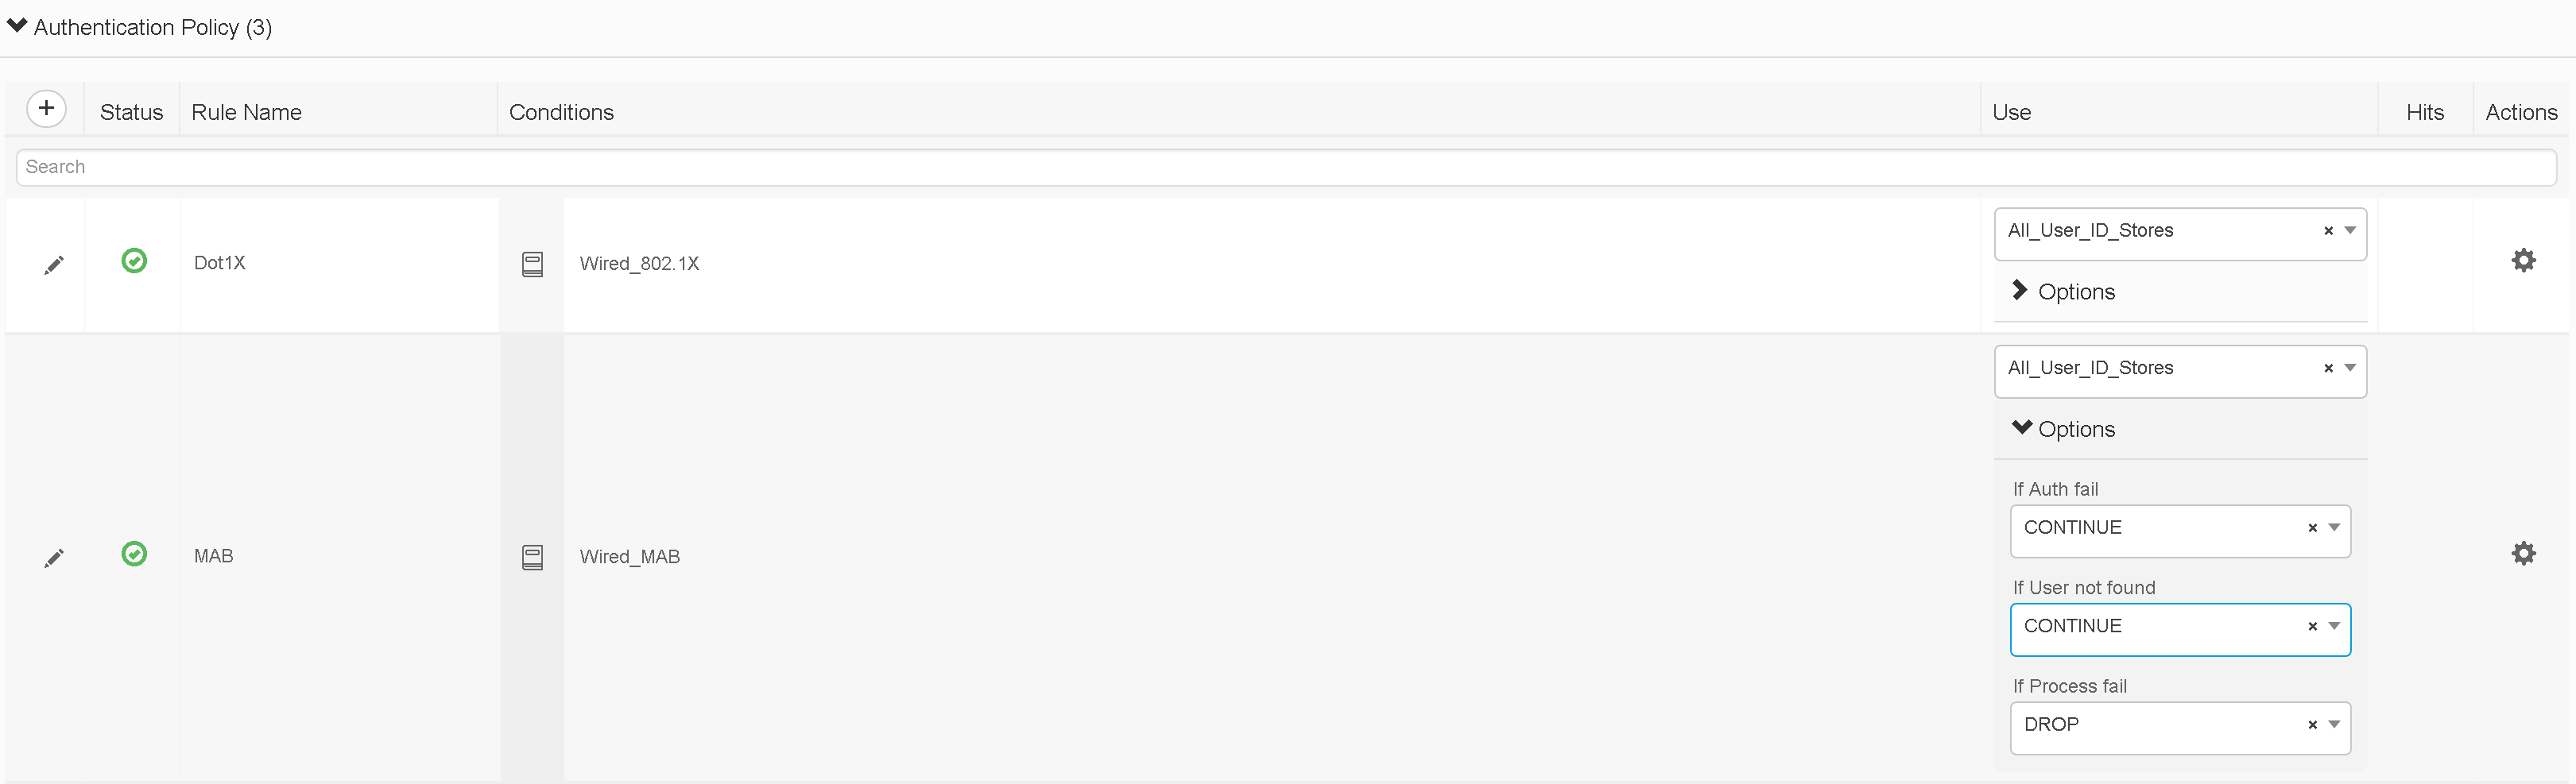
- Authentication Rules - Inside your monitor mode policy set, create an authentication rule for 802.1X (ISE comes with default 802.1X rule that works for this purpose) and a second authentication rule for MAB (MAC Authentication Bypass – again, ISE comes with a default MAB rule that works for this purpose). Optionally, to leverage the full benefit of monitor mode as a discovery phase for device profiling, visibility, and/or dynamic inventory of MAB endpoints (non-supplicant endpoints), ensure that your MAB authentication rule options are set to “continue” on authentication failure/user not found. This allows anonymous MAC addresses to continue on to be evaluated by the authorization policy as opposed to having their access rejected at the authentication policy level.
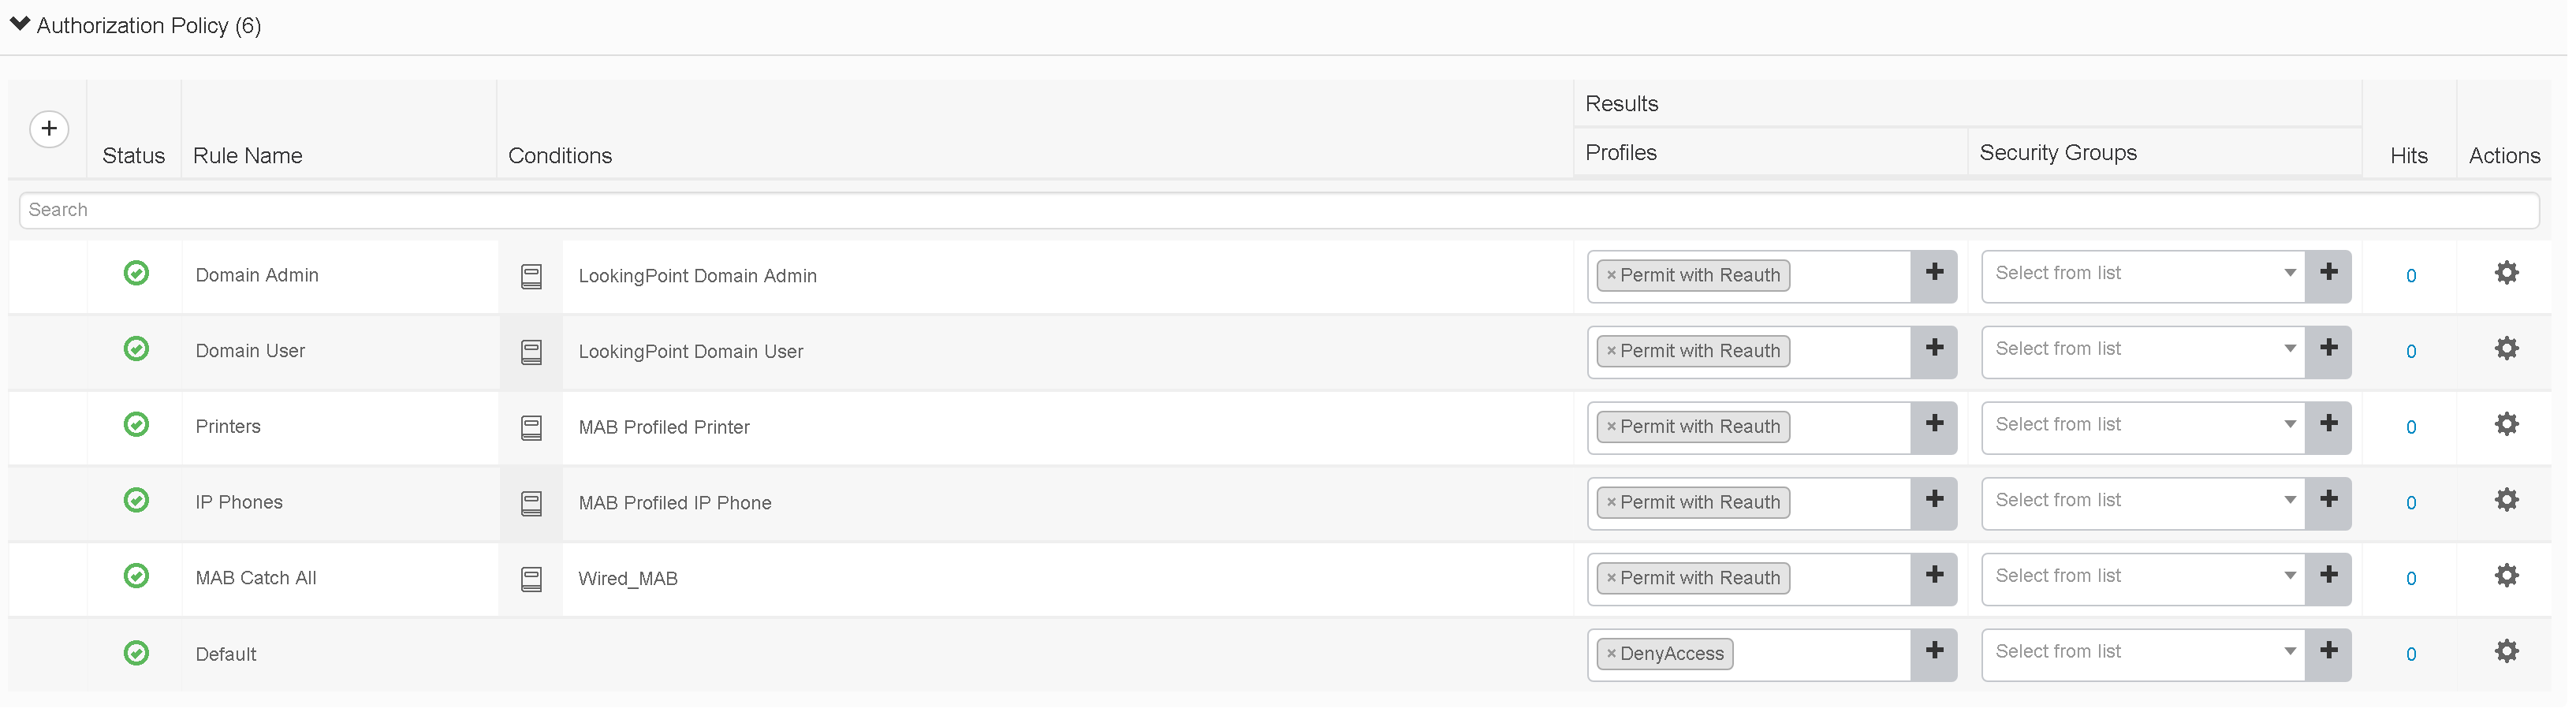
- Authorization Rules - In your monitor mode policy set, create authorization rules using your end state (enforcement phase) matching criteria, but be sure to only use basic authorization profiles. For example, if you ultimately want to enforce a different ACL for users depending upon their Active Directory security group membership, go ahead and create the different authorization rules for each group you want to ultimately authorize differently, but in monitor mode assign them the same basic authorization profile. By basic authorization profile I mean an authorization profile where you are doing nothing other than “Access Accept” or “Access Reject” optionally with a reauthentication timer set. With that in mind, create authorization rules for all of your use cases for both 802.1X and MAB. Next, create an authorization rule above “default” that matches authentication type of MAB and assign it an authorization result with “Access Accept”. This rule works hand in hand with the MAB authentication rule that we set to “continue” in the authentication rule section. We do this for better device profiling visibility as some of the device profiling probes (to be discussed in later blog post) only kick in after ISE receives a RADIUS accounting start message from the NAD and that accounting start message only comes after the RADIUS server sends an “Access Accept” message for the authentication in question. Finally, set your default authorization rule to a authorization profile set to “Access Reject”.
- Network Access Devices – In order to begin sending authentication requests from our monitor mode access switches to the correct policy set, we will set the “Deployment Stage” attribute on the NAD to “Monitor Mode”.


Auditing Monitor Mode in Cisco ISE
Now that we have completed the supplicant, authenticator, and authentication server configurations for monitor mode, we’ll usually let it run for a period to gather data, and at regular intervals pull reports to audit the progress. We are particularly interested in looking for failed 802.1X authentications as well as the successful authentications matching our default MAB authorization rule. The end goal of the audit period is to run a report that shows zero 802.1X failures and zero matches on the catch-all MAB authorization rule from corporate approved endpoints. Corporate approved endpoints being the key phrase in the preceding sentence as you will surely see at least a few devices failing 802.1X or matching the catch-all MAB rule, but if they aren’t corporate approved you will be fine (you won’t lose your job!) to kick them off the network come time for enforcement phase.
The report we are interested in auditing here comes from the ISE menu Operations > Reports > Endpoints and Users > RADIUS Authentications.

What do I do after my audits are clean?
After you are sufficiently comfortable with your audit data and have performed all necessary remediations, you can decide to move to one of two next step deployment phases; low impact mode or closed mode. Low impact mode works similar to monitor mode in that it makes use of the pre-authentication ACL (PACL) and authentication open on the access switch port configuration, but as opposed to the PACL allowing all IP traffic, we will typically limit this to a subset of access such as DHCP, PXE boot, etc. In closed mode, we will remove the pre-authentication ACL (PACL) and the authentication open configuration from the access switch port and traffic will not be allowed to pass prior to a successful authentication/authorization. In either case, your supplicant (endpoint) configuration does not change. From the ISE policy set perspective, we would create a duplicate of the monitor mode policy, update the entry conditions (to specify the new Deployment Stage value), apply our enforcement authorization profiles (that used downloadable ACL’s, VLAN switching, etc.), and remove our catch-all MAB authorization rule. Finally, you would update the “Deployment Stage” attribute on the appropriate network access devices to “low impact mode” or “closed mode” depending upon your deployment needs.
What’s Next?
For a blog series that is supposedly about Cisco ISE, you may be thinking that we haven’t talked much about ISE. I agree, but that changes soon. So far, we’ve made it through the supplicants (endpoints), the authenticators (access switches), and next up is the authentication server itself, Cisco ISE. So, stay tuned for the next entry in our Cisco ISE series, where we look at the high-level overview of a Cisco ISE deployment.


Check out our awesome tech talk on ISE:
Written By: Dominic Zeni, LookingPoint Consulting Services SME - CCIE #26686
If you are interested in LookingPoint installing ISE into your network, feel free to contact us here!

Check out Dominic Zeni's podcast on ISE on IT in the Bay podcast:
