In our previous entries to this series, we’ve deployed ISE, integrated it with Microsoft AD, and configured the ISE server-side certificates. All of that being completed, we are now ready to configure our Policy Set for 802.1X and test it out.
The Scenario..
For our example here, we will be using 802.1X with PEAP-EAP-TLS authentication for one (shared) domain-joined Windows computer and two different users logging into the shared PC. We need to create an ISE Policy set to enact the businesses Network Access Security Policy, which states:
- When no user account is logged-in to a Windows domain-joined computer, that computer should only have access to the Microsoft AD Domain-Controller in order to receive GPO updates and process user logons.
- All domain-user accounts should only have access to browse to secure websites.
- All domain-admin accounts should have full, unobstructed access to the network.
Piece of cake.
First, lets review what we’ve already completed behind the scenes..
In an effort to limit the scope of this post, we have already done some heavy lifting. Don’t worry, we’ve covered all of that work for you in previous blog posts.
What we have already done:
![]() The users have been created in Active Directory:
The users have been created in Active Directory:
-isedomainuser@lookingpoint.com (member of Domain-Users)
-isedomainadmin@lookingpoint.com (member of Domain-Admins)
(Before you try it, we’ve already deleted these users by the time your reading this!)
![]() We issued (automatically via GPO) these users and computer a certificate to use for PEAP-EAP-TLS 802.1X Authentication.
We issued (automatically via GPO) these users and computer a certificate to use for PEAP-EAP-TLS 802.1X Authentication.
![]() We configured the native Windows 802.1X supplicant (automatically via GPO) to use computer and user authentication with PEAP-EAP-TLS when connecting to an 802.1X enabled network.
We configured the native Windows 802.1X supplicant (automatically via GPO) to use computer and user authentication with PEAP-EAP-TLS when connecting to an 802.1X enabled network.
![]() ISE has been deployed, AD integrated, and server-side EAP certificate issued.
ISE has been deployed, AD integrated, and server-side EAP certificate issued.
![]() Our network access device has already been provisioned for 802.1X authentication in closed mode.
Our network access device has already been provisioned for 802.1X authentication in closed mode.
How should we accomplish the role-based access control?
We have a few different mechanisms in which we can enforce the access restrictions on the domain-user account.
- ISE could dynamically assign a VLAN (with ACL on the router/firewall that is the gateway for this VLAN).
- This is the legacy approach. Anytime we call something legacy, what we really mean is that we don’t like “it” and we now have way better methods of accomplishing what “it” did. This solution doesn’t scale, its not sexy, and we can have a sidebar later around all the issues you can run into with client DHCP renewals in various CoA scenarios.
- ISE could reference the name of an ACL configured on the access switch.
- This is better than VLAN assignment and commonly deployed still today...when we have to. This prevents a problem any time I want to make a modification to the ACL. Since the ACL is configured on the access device (NAD), we’d need to have good, centralized configuration management tools or this approach can become operationally unwieldy.
- ISE could dynamically push an ACL to the access switch. (winner for this post!)
- Ah the downloadable ACL. Holy grail? Not quite, but it beats the hell out of having to manage an ACL on each access device. With this approach we can at least make ongoing ACL updates from a central location (ISE) and those updates take effect anytime the ACL is downloaded thereafter by the NAD. The main issue here (along with #2) is that across time, the size of this ACL may become too big to be loaded in memory of some access devices. In our scenario, where we aren’t using any IP addresses in the ACL, it works fine. When you begin to define many different destination IP’s/subnets in the ACL, this is where the scale problems come in over time.
- ISE could dynamically push an SGT/SGACL to the access switch.
- Group-based segmentation. The high-level concept here is that we never reference IP addresses in our ACL’s. Instead we assign things to security groups and we write policy based on layer 4-7 information, from source group to destination group. This is the way of the future for micro-segmentation. This solution is still largely proprietary, but continuously being adopted by more vendors in one form or another. We haven’t provided you enough background in this series yet in order to select this enforcement technique for this blog (without increasing blog scope too much), so that is why we’ll pass on it for now. We’ll cover it before we are done with this series.
Ok, let’s go! AD Group Import to ISE
We will start off by making sure we’ve got all the AD groups pulled into ISE that we want to use in our policies. After navigating to Administration > Identity Management > External Identity Stores > AD Instance > Groups tab, we can see that we haven’t yet imported our domain admins group.
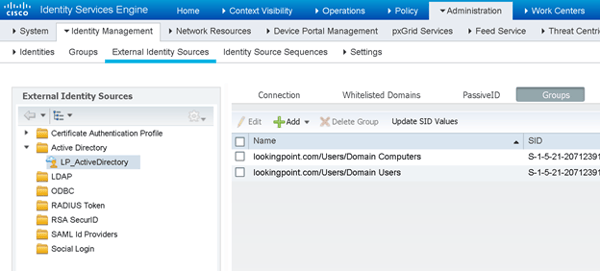
No biggie. We’ll click that Add button and pull it in.
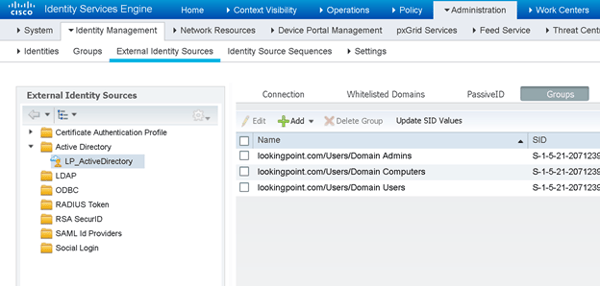
There we go, that looks better. Save.
Policy Sets – Let’s Review
Let’s have a little primer on what Policy Sets are and how they get evaluated in ISE. Policy Sets are different collections of Authentication (AuthC) Rules and Authorization (AuthZ) Rules that apply to various use-cases in the ISE deployment. Being that we can have many Policy Sets in an ISE deployment, how does ISE know which one to use for a given authentication request? Great question and thanks for asking! ISE applies matching criteria to each policy set. The matching criteria can be based on a combination of network access device (NAD) attributes and/or authentication protocols (EAP-TLS, PEAP-MSCHAP-V2, PAP, etc..).
The policy sets reside in an ordered list. The matching criteria are evaluated top-down, with the first matching policy set being selected. Knowing this, we can understand that if we will end up with overlapping matching criteria between two (or more) different policy sets, we need to order the policy sets with more specific matching criteria higher than the more generic, overlapping ones. As a second “sorting” best practice, you should order the most commonly used policy sets as close to the top of the policy set list as possible. This saves ISE from having to evaluate the less frequently used policy set matching criteria on every request that will end up matching your most popular policy set. This isn’t critical for small scale deployments, but can make a big difference in large scale distributed deployments.
Policy Sets – Our Matching Criteria
For our purposes of this post, we’ll create a policy set with the following matching criteria.
![]() The authentication request is Wired 802.1X
The authentication request is Wired 802.1X
- Wired is matched based on the RADIUS NAS-Port-Type equaling “Ethernet”
- 1X is matched based on the RADIUS Service-Type equaling “Framed”
- ISE comes with a pre-built condition that uses these attributes, we’ll use it.
![]() The authentication protocol is PEAP-EAP-TLS
The authentication protocol is PEAP-EAP-TLS
- For this we will make a custom “Allowed Protocols” list where the only protocol selected is PEAP-EAP-TLS. This can be created at Policy > Policy Elements > Results > Authentication > Allowed Protocols. For our example, we made one called “PEAP-EAP-TLS”.
- ISE comes with a default Allowed Protocols list that allows for PEAP-EAP-TLS amongst others. As a best practice, we are creating a custom Allowed Protocols list to meet only our requirements.
Here is what it looks like all put together:

Policy Sets – Our Authentication Policy
The first thing that happens after we match our policy set (in this case meaning we have received an authentication request for Wired 802.1X using PEAP-EAP-TLS) is the actual authentication of the 802.1X supplicants supplied credential (a certificate in this case since we are using PEAP-EAP-TLS). So, how do we authenticate certificates?? Just like everybody else on the planet does. Mainly, we need to (1) trust the issuing CA/CA chain for client authentication and (2) the client (and CA) certificates needs to be within its validity period.
To this end, let’s take a quick peek at an example of the client’s public certificate that will be presented in EAP-TLS.
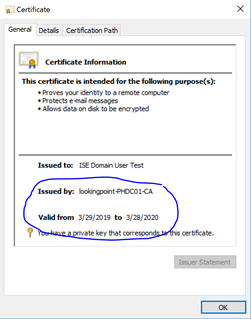
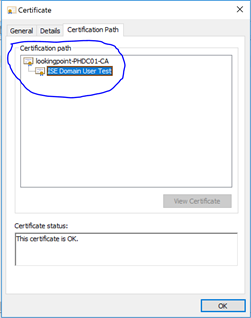
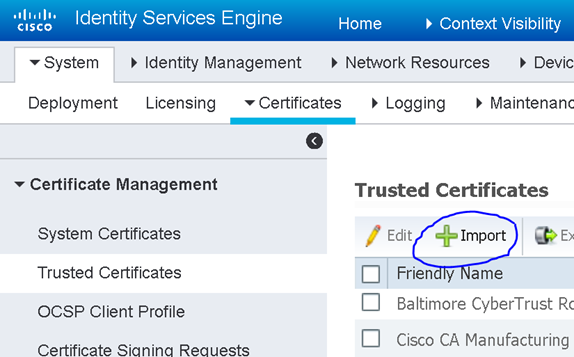
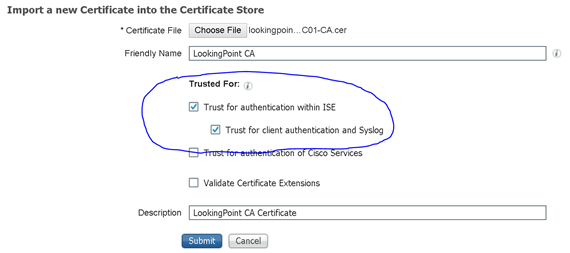
By looking at this certificate, we know that ISE needs to trust the “lookingpoint-PHDC01-CA” certificate for client authentication in order to successfully authenticate this certificate. No problem, we’ll upload that certificate through the ISE administration portal here: Administration > System > Certificates > Certificate Management > Trusted Certificates (oh, and this will only need to be done on the PAN. PAN will replicate this to all secondary ISE nodes. Thanks PAN!).
Sweetness, now that we have a CA trust established, are we ready to write our authentication rule?? Almost my friends, almost. Remember how we need to differentiate access based on AD security group membership? If you’ve been following closely, you see what I’m getting at. How are we checking for AD group membership? We are using certificates and can authenticate them independently of AD. We never have to interact with AD to authenticate the client’s certificate! Oh, no! Design flaw. Scratch the whole thing. I quit.
Not so fast, seems that Cisco thought of this too. We don’t have to use AD for authentication in order to use AD user attributes to authorize the user. We do however need an identity of the user in order to lookup those AD attributes. This is where Certificate Authentication Profiles come in. Lets head on over to Administration > Identity Management > External Identity Sources > Certificate Authentication Profile to create one. First though we need to know which field in the certificate we should look for the user’s identifying information. Let’s look at the client’s certificate again.
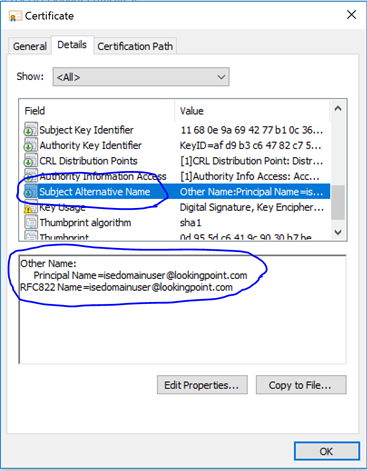
Great Scott! It appears we have identifying information in the Subject Alternative Name field!! We’ll setup the Certificate Authentication Profile as follows.
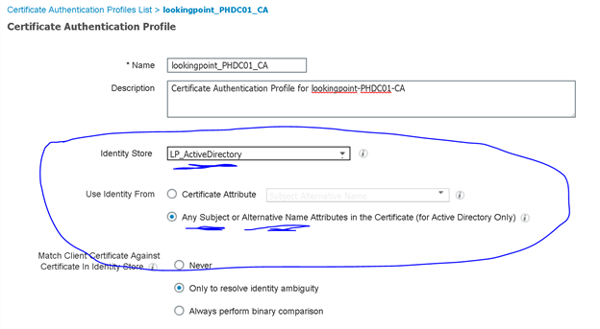
As an added layer of protection, you could ensure the certificate matches a certificate stored in AD for the user. Whether or not this certificate is stored in AD would be dependent upon the certificate template configuration it was created from. For now, we’ll just leave the default “Only to resolve identity ambiguity” checked (multiple accounts have the same identity attribute we grabbed from the certificate – not likely but could happen). Ok, make sure you saved that.
My kid: “Can we make our authentication policy now?”
Me: (long pause – no reaction – waiting for magic word)
My kid: “Pleeeease?”
Yes, we’re ready. We’ll navigate to the policy set we created in the previous section and click the right-facing arrow on the right-hand side of the page to go inside and configure the authentication rule.

The first thing we should do in Deny Access to the default authentication rule (I’m personally not keen on using defaults for anything – lets be specific). Next, we’ll add our good rule above the default. In this case, we’ve created a rule that matches certificates issued by “lookingpoint-PHDC01-CA” and uses the lookingpoint_PHDC01_CA Certificate Authentication Profile we created the previous step.

Save.
Policy Sets – Our Authorization Policy
After we have successfully authenticated the computer/user certificate, we move onto evaluate the authorization policy (if the certificate authentication fails, we do not evaluate the authorization policy, instead we send an access-reject back to the NAD straight away). Now, based on the requirements set forth at the outset of this post, we need to create three different authorization rules.
- For domain computers
- Should apply a DACL limiting access to the AD Domain Controllers / DNS / DHCP
- For domain admins
- Should simply permit access (no filter applied)
- For domain users
- Should apply a DACL limiting access to secure web browsing / DNS / DHCP
For the authorization rule conditions, we’ll simply match on AD group membership. In order to reference the DACL, we first need to create it, and the Authorization Profile that references it. Then (and only then) we will be ready to create our Authorization Rules in the policy set.
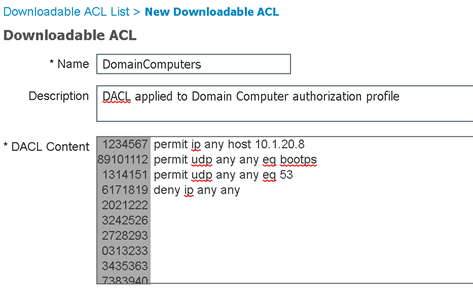
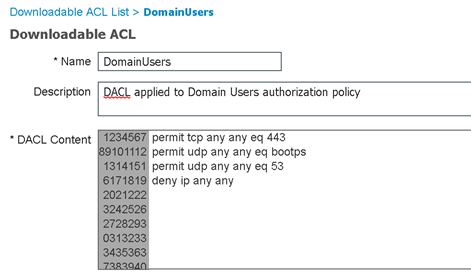
We can create the DACL’s we need by navigating to Policy > Policy Elements > Results > Authorization > Downloadable ACLs > Add.
Domain Computers DACL
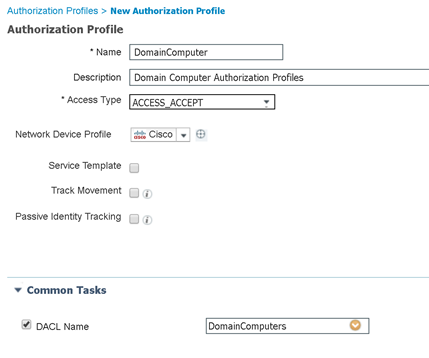
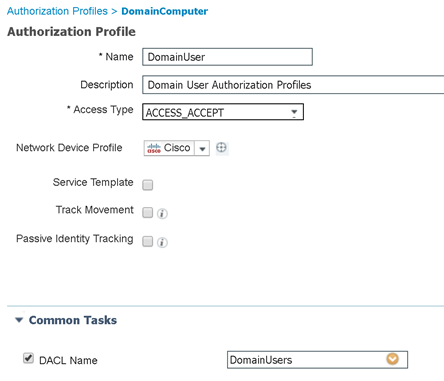
DACLs, check! Now we can create the authorization profiles that will reference them by navigating to Policy > Policy Elements > Results > Authorization > Authorization Profiles > Add.
Domain Computer AuthZ Profile
Domain User AuthZ Profile
Authorization Profiles, check! Now we are finally ready to tie this all together in our authorization policy. Let’s navigate back to our authorization policy and create three rules; one for domain computers, one for domain users, and one for domain admins.
Here’s what that looks like!
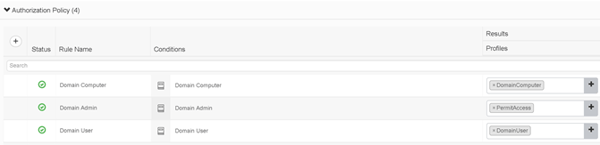
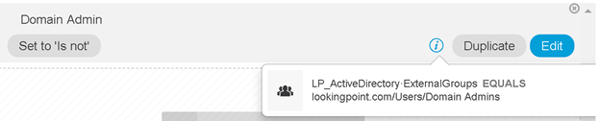
The order of the rules above for domain user/admin are important as our domain admins will also be members of domain users (but the same is not true in reverse). So you have an idea of what is inside those conditions above (Domain Computer, Domain Admin, and Domain User), here is what the Domain Admin condition contains.
We’re done! Err..wait...should we test?
OK – Let’s Test!
I thought you might be interested to see if any of this actually worked. Here we go. For validation, we will look for the DACL applied to the switch port our computer is connecting to.
Let’s see what happens when nobody is logged into Windows
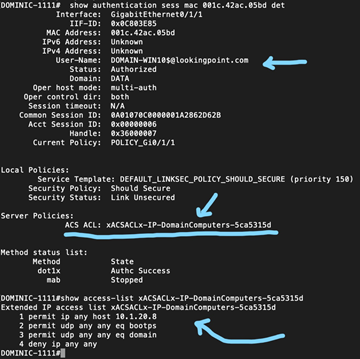
Looks good!
Now, let’s see what happens when a domain user logs into Windows
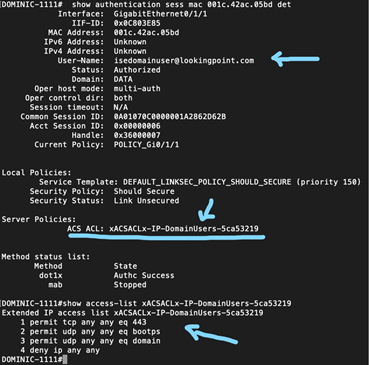
Looks good!
Now, let’s see what happens when a domain admin logs into Windows
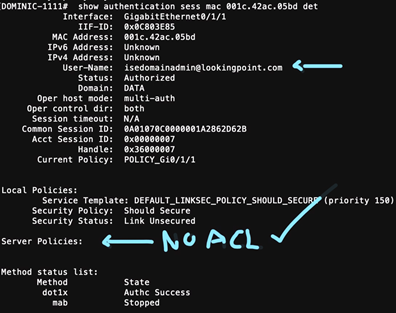
Damn, we’re good.
What’s Next?
Hope you enjoyed this recent series of posts! Being that we alluded to using SGT’s and SGACL’s as an option (in lieu of DACL’s, which we covered here), I think it is high time we introduced you to Cisco TrustSec micro-segmentation! Be on the lookout for the next post!
Check out our awesome tech talk on ISE:
Written By: Dominic Zeni, LookingPoint Consulting Services SME - CCIE #26686
If you are interested in LookingPoint installing ISE into your network, feel free to contact us here!