


Hello loyal LP blog cats. In this week’s quick post, I’m going to show you a tactic I use to ensure that you never lock yourself out while making changes to a Cisco router or switch configurations.
As a best practice we always advise that our customers utilize centralized AAA servers rather than local accounts for device administration. This is great but sometimes during a change we might lose connectivity to these centralized servers for a short period and inadvertently lock ourselves out.
Let’s look at an example of this issue and then how we can work around it.
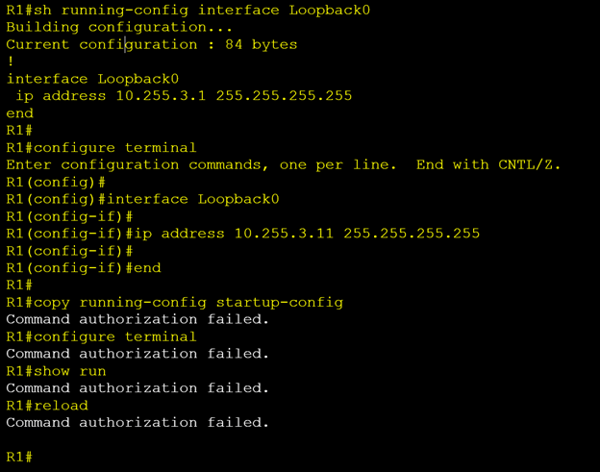
In the example above we have been tasked with updating R1’s loopback 0 ip address from 10.255.3.1 to 10.255.3.11.
Seems simple enough so we SSH into our router. Check the current ip address assigned to loopback 0 to confirm that we are on the correct device. Looks good so we move into global config mode and make our change. The new IP address is applied. Hooray, another successful job done. Let’s save our config and head to the pub for a round of celebratory drinks but wait what’s this…….
I cannot save the config. We are getting an error “Command authorization failed”. Nothing works; every command we attempt ends in the same result. We cannot even reload the device to roll our config back.
So, what’s going on here. Well this router is using centralized TACACS+ servers (ISE or ACS) to both authenticate and authorize users. TACACS+ command authorization needs confirmation from these central servers before accepting any commands. The IP address this router is using to send these authorization requests is you guessed it the Loopback 0 address.

So, when we changed the IP address on the Loopback interface, our TACACS+ server is now receiving authorization requests from an address it does not recognize and thus denies it.

We need the TACACS+ server admin to update their config to accept the new address. Great but what if the group that manages these servers are not available after hours?!
This same kind of issue can occur in multiple different scenarios and for both RADIUS and TACACS+ servers. The problem is that during some changes we can temporarily lose connectivity to these central servers and get caught in a catch 22 situation like the one demonstrated above.
My workaround for this is to use a temporary local account and dedicated VTY line during changes, so I can never get locked out.
Let’s look at my same example but this time with our workaround in place:
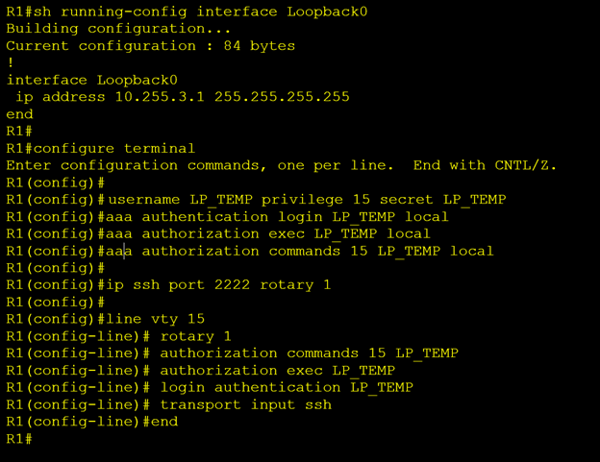
Once again, I SSH into our router and confirm that I’m on the right device by checking the loopback 0 ip address. Now before proceeding with our IP address change, I add a new account to the local user database called “LP_TEMP”. I also create three new AAA method lists with the same name for authentication, exec auth and command auth. Then I create a ssh rotary group “1” which listens on port “2222”. Finally, I apply the above config under VTY line 15. Notice that I do not change the other 15 vty lines (0 through 14).
Now I can open a new SSH session over port 2222 using my new temporary local credentials.
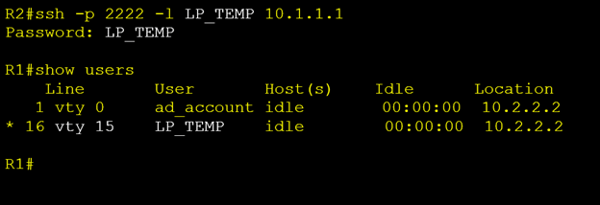
In the output above we can see that we are connected to VTY 15 while our TACACS+ account “ad_account” is connected to vty 0. We can now safely proceed with all our changes knowing that we will never lock ourselves out.
Once your changes are completed you can test AAA authentication/authorization. If all looks good, remove our temporary account, method lists and return VTY 15 config back to match the other vty lines and save your config. Now we can finally head off to the pub for that well-deserved beer.
Whenever I’m making routing changes, I always use this method along with the configuration rollback feature that I wrote about in a previous blog (Cisco’s Configuration Rollback Feature).
Hopefully these tips help you on your next change. Until next time I love you Byyyyyyeeeeee

Written By: Chris Marshall, LookingPoint Senior Solutions Architect - CCIE #29940