


Having fun yet? Yeah? Well hold on to your hat because in this entry we’re going to dig into CTS classification!! Let’s try that again with a little more alliteration. Today we’re collapsing all of our coverage so as to claw at and climb into every crevice of CTS classification! Right, so let’s go*!
*If this is the first entry you are reading in this series on CTS or you don’t know what CTS means, or why it is a relevant topic to begin with, start here at the beginning of this series.
The Necessary (and perhaps mind-numbing) Planning
In order to classify users, servers, and “things” into CTS Security Groups, we first have to define where the group boundaries will exist. For example, do we want to create only a single group for each users, servers, and “things”? Not likely. You will likely have a set of users that should access a certain set of servers, another set of users that should access another set of servers, so on, and so on. So how far do we go? How many groups do we create? Who makes that decision? It goes without saying that the answers to these questions will be specific to each and every business use case. For a small company or a start-up, the answers to these questions may be simple and answer-able by a single person or a tight-knit group of IT overlords. For larger enterprises, answering these questions will likely involve a series of cross-functional team meetings to produce governing documentation (namely a Network Access Security Policy) and quite possibly require sign-off all the way up to the C-level. As the IT Security doer, your job will then become an exercise in translating this high-level Network Access Security Policy into the low-level implementation equivalent (which for this series we are assuming that will be the Cisco CTS framework). This post is not going to attempt to cover the strategy, processes, and people required to create the higher-level Network Access Security Policy. However, having an understanding about the lower-level CTS implementation may help inform some of the higher-level decisions on your Network Access Security Policy. So, I’ll give you a few things (definitely not a complete list) to keep in mind.
- Keep in mind that the CTS Security Group assigned to a user/server/thing defines what that user/server/thing is allowed to do on the network. The takeaway for this point is that anything you put into a CTS Security Group will have the same access as anything else you put into that same CTS Security Group. Meaning that if you have two different users that you want to have two different sets of access permissions for, those two users should belong to two different CTS Security Groups.
- Keep in mind that where you plan to apply/enforce your CTS policy will determine the capabilities you have for the kinds of filtering you can perform using CTS Security Groups. For instance, if you plan on enforcing policy using CTS SGACL’s on network switches (e.g. Catalyst 9000) or routers (e.g. ISR4000) then you will only be able to apply L3/L4 filtering. This is as opposed to enforcing policy using your CTS Security Groups with a SG-Firewall policy (e.g. FirePOWER Threat Defense) which would be capable of applying L3-L7 filtering. I mention this at this point in the post, because if you are planning on creating two groups for the purpose of…I don’t know…say filtering Skype calls between them, but you don’t have an enforcement point in between these two groups capable of L3-L7 filtering, then…whoops…that planning was for not.
- Keep in mind to keep it simple! At least to begin with, and especially if you network access security policies are not well-defined. Your CTS classification and policies can grow with you over time as your network access security policies become more well-defined and you become more operationally familiar with the CTS paradigm shift. Begin by addressing the low hanging fruit where the connectivity requirements are well defined. Limit access from normal users to Intranet web application servers to only TCP80/443. Lock down access from normal users to your Windows terminal server to only TCP/3389. Prohibit everyone from talking to your HVAC system management network. The easy stuff!
CTS Security Groups
After all of that diligent planning and interpretation of the Network Access Security Policy (well done!), we can begin classifying all the different network connected things (users, devices, servers, etc..) into CTS Security Groups.
CTS Security Group Creation!
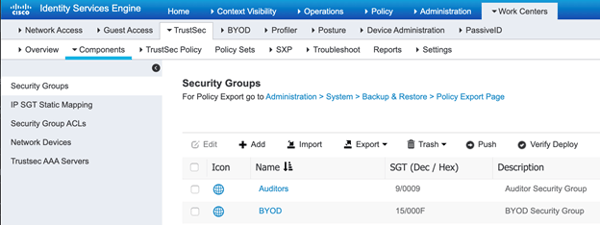
First, we need to create the groups to begin with. Where do they get created? ISE! You’ll see that ISE comes with a list of many security groups to begin with. Check these out at on your ISE PAN by navigating to Work Centers > TrustSec > Components > Security Groups.
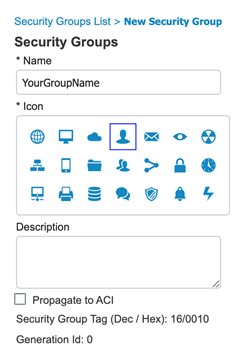
Create your own security groups by clicking that button. Just give it a name, select an icon, give it a description, and hit save. You’ll notice that this creates a corresponding decimal/hexadecimal value for your new group, but that is completely under the hood and there is no need to ever remember that!
CTS Security Group Classification!
Worried about impacting service? Don’t be. We haven’t configured any of our network elements to use CTS yet, so this is all preparatory work! Additionally, as we move along into the final entry in this series, you’ll see that we’ll make the recommendation to begin with a blank/default CTS policy matrix when initially configuring the network elements for CTS. The default CTS policy matrix will permit all traffic between all SGT’s. This allows us complete, worry free provisioning of the infrastructure prior to implementing any restrictive policies. Now that I have quelled your fear, squashed your uncertainty, and hopefully stuck a fork in your doubt, let us begin classifying! There are two ways to classify; dynamically or statically.
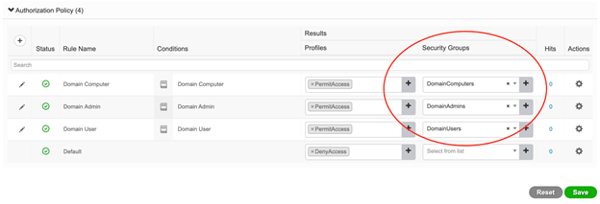
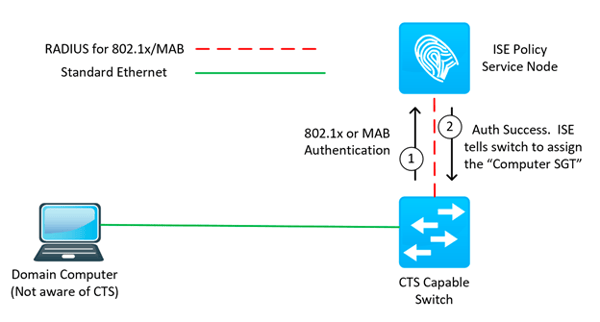
Dynamic classification always refers to a CTS Security Group being assigned as a result of matching an ISE RADIUS authorization policy. Knowing this, you would be correct to infer that dynamic classification will by and large only take place on our campus wired, campus wireless, and VPN access networks (as those are the access networks that we protect with RADIUS authentication and authorization through ISE). Great! What attributes can we then use to dynamically classify a network connected thing to its appropriate CTS Security Group? Pretty much anything. Really, no lie! Since we are leveraging ISE’s robust policy engine, we can write policy conditions to match any combination of authentication methods/protocol, network location, Active Directory group membership, endpoint posture status, device types, time of day, and much, much more. A condition combination involving Active Directory group membership is by far the most common approach to classify users into their appropriate CTS Security Group (SGT). Ok, now for how to do it! Navigate to Policy > Policy Sets > and click to enter into the policy set you are working with. Expand the Authorization Policy and populate the appropriate Security Groups into the appropriate rules! That’s it! Save. In the below example, I’ve created three authorization rules that match three different Active Directory groups and then selected the CTS Security Group that corresponds to the AD groups.
This will result in ISE communicating the SGT the authenticating endpoint belongs to as a part of the RADIUS authorization message sent back to the network access device the endpoint is connecting to. Which means that the network access device the endpoint is connected to is now aware of the SGT this endpoint belongs to.
Bravo! I’d tell you more, but its classified! See what I did there? Hehe…okay onto the next!
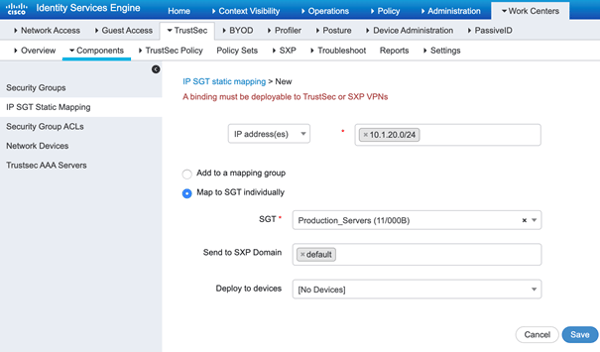
Static classification refers to classifying the different network connected things based on their IP addresses. Since we will be using dynamic classification for our campus wired, campus wireless, and VPN access networks, what does that leave us to use static classification for? Ah, yes! The data center! But wait…why not dynamic? If you’ll remember from the preceding bit about dynamic classification (and I hope you do!), dynamic classification happens through the ISE authentication/authorization process. More often than not, you don’t see authentication (802.1x or MAB) enabled at the data center for a couple good reasons. First, the physical perimeter is usually very secure (you don’t find data center switchports patched outside of the room/cage). Second, typically we are connecting trunk (802.1q) ports down to the data center servers and 802.1x/MAB does not work on trunk ports (at least not in any context we need it to). More reasons abound, but we’ll stop there for now. There are ways to dynamically classify data center resources into CTS Security Groups (via ACI/ISE integration), but that goes beyond the scope of what we are introducing here. That being said, we need to statically classify our data center servers/applications into CTS Security Groups. How to do this? ISE, ISE baby (there are other ways, however, they involve maintaining the static mappings on individual network switches, so let’s cancel that order and keep it centralized). On ISE, head on over to Work Centers > TrustSec > Components > IP SGT Static Mapping and click . Below we’ve added a mapping that specifies anything on the IP subnet 10.1.20.0/24 should map to the Production_Servers SGT. Save.
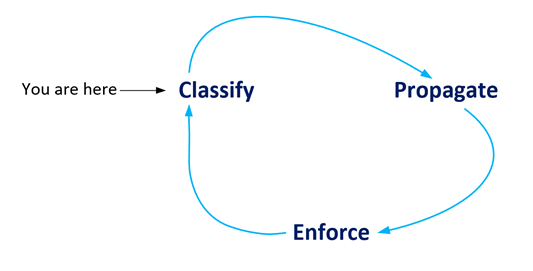
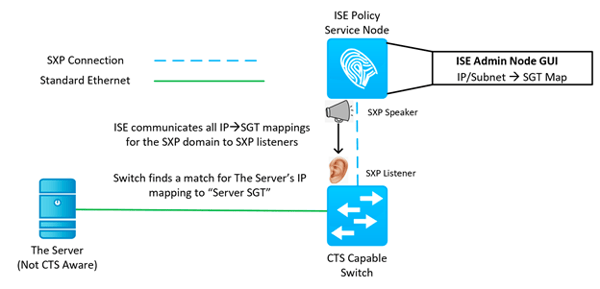
At this point, ISE has the static mapping. Who else has it? NOBODY! You’ll recall that when we performed the dynamic classification, ISE communicated the dynamic mapping down to the network access device. We need another protocol to help us communicate these static mappings. Not only that, but if your network is like most networks I work on, your network doesn’t support end to end propagation of the SGT’s in the data plane. This means that even your dynamic SGT classifications need another control plane protocol to communicate those mappings across CTS islands in your environment. That leads us to the main topic of our next entry in this series, partially depicted in the image below.
What’s Next?
When this CTS series is complete, I think you’ll agree that classification is the easiest part, and that is sandwiched in between two of the harder parts; the planning and the propagating. In the next entry to the CTS mini-series, we’ll pose poignant questions and solutions about the possibly problematic CTS filtering prerequisite of propagation. Nothing like beginning with a little alliteration and ending with a little more. Okay, sorry for that, I’m done. Thanks for reading!
As always if you have any questions on getting Cisco's ISE set up for you and your business and would like to schedule a free consultation with us, please reach out to us at sales@lookingpoint.com and we’ll be happy to help!

Dominic Zeni, LookingPoint Consulting Services SME - CCIE #26686