


WebEx Calling is Cisco’s Enterprise Cloud based calling solution. It allows companies to have their phones registered to Cisco’s cloud and it provides a rich set of features including an interface to the PSTN.
WebEx Calling is full of features designed to make communication easier, richer, and more efficient. Basically, get more out of your phone system.
The topic today is Auto Attendant, Queues & Hunt Groups. While they all appear very similar, mostly play a prompt or music file to a caller, hold the call if there no available users to take the call, and distribute the call among a group of users.
However, each one of these features is designed with a specific goal in mind.
Auto attendant’s main use is to welcome callers from outside the company, present them with options to route their call internally within the company’s departments and then send the call to the appropriate user. Auto attendants can also route calls to Queues & Hunt Groups.
Queues on the other hand, can also welcome calls from outside the company but it doesn’t offer the option to route between departments. Callers are presented with automated answers, music on hold or comfort messages and a selected method to route calls to users. Queues are best suited for internal use when the option to queue is needed. Also basic reporting is provided with Call Queues.
Hunt groups are very similar to Queues, except the queuing feature. They route calls to a group users based on a configured routing method.
Before we start with the configuration of the Auto Attendant, an important feature that needs mentioning is the schedule + holidays. Auto Attendants need to know when the business hours are so they can better route calls (unless it’s a 24-hour business, 7 days a week with no holidays).
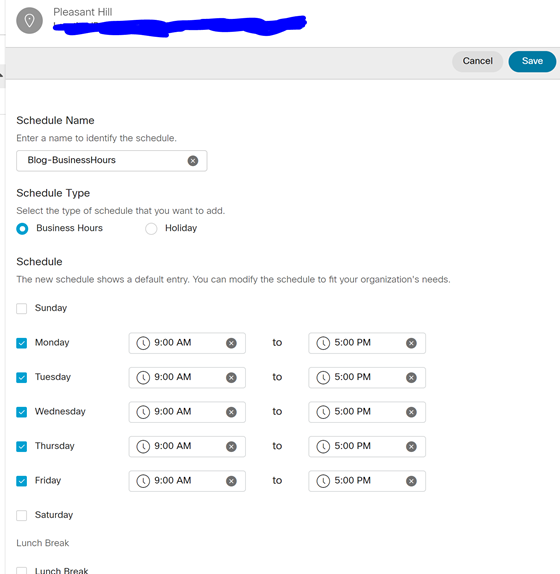
I. Schedule + Holiday
- Schedule and holiday are tied to a location. As different locations may have different schedules/ holidays.
- Go to Calling (under services on the left pane) and click on locations.
- Select a location by double clicking on it and a side bar will open.
- Under Call Settings click on scheduling and then on the blue button Add Schedule.

- Enter a name for your schedule.
- For Schedule type select Business Hours.
- Select the days and time periods your business will be open.
- You have the option to include a lunch break if needed (it applies to every business day)
- To create a Holiday Schedule, Click on Add Schedule again.
- Name the schedule and for Schedule Type select Holiday.
- Click on Add New Holiday
- Name the holiday, select the recurrence rate (none, weekly or yearly).
- Select if its an All-day Event.
- Then you have the option to select if the holiday falls on a specific date (i.e., 4th of July or a specific day, i.e., third Monday of the month).
- Add all the holidays that this location is closed in.
- Save it.
II. Auto Attendant
- Just as Schedules are per location, so are Auto attendants. Different locations can have different auto attendants.
- To create an auto attendant, Go to Calling (under services) and click on features.
- The page will default to auto attendant.
- Click on the blue button Create Auto Attendant
- Select a location for your auto attendant and enter a name.
- Enter a DID or an Extension if it won’t be PSTN facing, or both.
- Select Language and Enter Caller ID. Click Next

- On the next page, select the business schedule that you previously configured, or you can create a new schedule. Click Next
- On this window, Select the holiday schedule that was previously configured, or you can create a new one. Click Next.
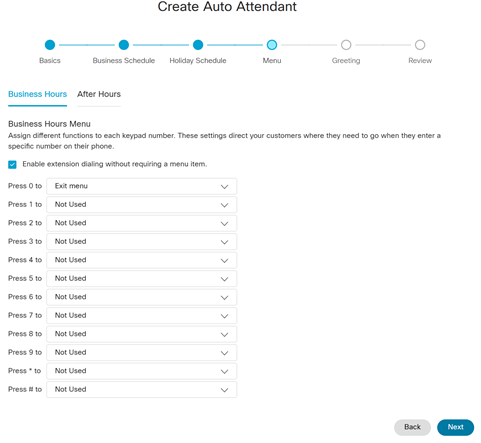
- On the menu window, you can configure each key where to route the call. You can change the options for Business Hours or After Hours.
-
- You can also enable extension dialing without requiring a menu item.
- This means that callers do not have to hear the full prompt, they can enter an extension before the prompt finishes.
- Drop down menu includes the choices you have for each button
- You can transfer a call directly to a user, hunt group, or queue.
- You have the option to play a prompt before transferring.
- You can also transfer to Voicemail.
- There’s also a repeat or exit option.
-
- On the next window you can select the greeting for business hours and after hours.
- There’s the default prompt and there’s a customer greeting.
- For the custom greeting you can attach a .wav file or record greeting.
- Record greeting can be done using a phone or a computer’s mic.
- On the window you can review all the configuration and click create to finalize the auto attendant.
III. Call Queue
- Call Queues are also tied per location.
- Call queues lack the Menu keys that can route the call to departments or destination
- You can configure overflow settings, should the queue reach its limit, you select a destination to send new calls to.
- To create a Call Queue, Go to Calling (under services) and click on features.
- On the top of the page, click on Call Queue and then create Call Queue.
- On the Basics Page:
- Select a Location for the Call Queue
- Enter a name for the Queue
- Enter an Extension or a DID
- Maximum number of calls that can be held inside the Queue (max 50).
- First Name / Last name
- Select Language

- On the Call Routing Page Select how you would like to distribute calls to the agents that you will assign to this queue
- Circular: will go through the list of agents one by one.
- Top Down: Will always select the available agent on the top of the list, if they’re not available will select the 2nd one and so on.
- Longest Idle: Send the call to the agent who hasn’t received a call for the longest time.
- Weighted Max: Every agent is given a weight, and based on that weight its decide if they will receive the call or not.
- Simultaneous: will ring all agents at the same time.
- Next to each method , there’s a number of the maximum supported agents per method.
- Overflow Settings
- Here you can configure what happens when you receive a call when your queue has reached the maximum number of calls.
- You can either play a busy tone.
- Or transfer to another queue, route group, user, or voicemail.
- Or keep the ringing tone until the user hangs up.
- You can also set a maximum time for calls to stay in the Queue and then give them the overflow treatment. You enable that by enabling the overflow after calls wait X seconds. Then enter the number of seconds that represents the maximum waiting time in the queue.
- You can also select to play an announcement before overflow takes place.
- Announcements
- You can choose to play a welcome message to callers calling into the Queue.
- Welcome message maybe optional (uncheck Welcome Message is Mandatory).
- You can select default announcement or play custom announcement.
- You have the option to play estimated waiting time or Position in Queue.
- Option to configure comfort prompt: a message that repeats every x number of seconds. X is configurable.
- Option to configure Hold Music. This music will be played when the call is waiting in the Queue and between comfort prompts if they exist.
- Agents
- On this page you select which users or workspaces will be receiving calls made to this queue.
- On this page you select which users or workspaces will be receiving calls made to this queue.
- Review
- Review your configuration and create the queue.
IV. Hunt Group
- The most basic feature out of the three. Calls ring a group of users based on a configured method.
- No queuing or internal routing within the hunt group.
- To create a Hunt Group, Go to Calling (under services) and click on features.
- Click on Hunt Group and create Hunt Group.
- On the Basic Page:
- Select the Location and enter Hunt Group Name.
- Enter Phone number DID and/or extension.
- Enter First and Last Name for Hunt Group and Select the language.
- Click Next.

- Select the Call routing method (similar to Call Queue above)
a. You can also select the set number of rings to alert each user before attempting to ring another user. - Routing Settings
a. Multiple options to treat calls in different scenarios - Select Agents
- Review and create hunt group.
As always if you have any questions on Webex Calling and would like to schedule a free consultation with us, please reach out to us at sales@lookingpoint.com and we’ll be happy to help!

Freddy Tabet, Network Engineer