


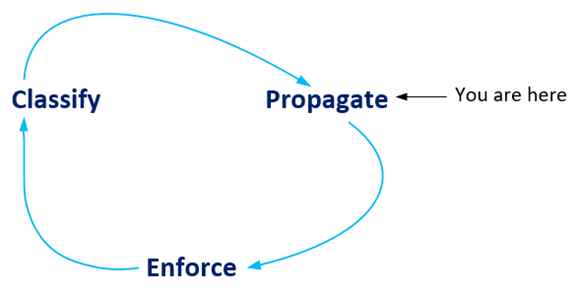
Chooo Chooo! The TrustSec Trains keeps rolling down the tracks in this latest entry. We’ve made stops along the way to tell you what TrustSec is, to give you a primer to TrustSec, to dig into the TrustSec classification, and now we move on to TrustSec Propagation! Right, so let’s go*!
*If this is the first entry you are reading in this series on CTS or you don’t know what CTS means, or why it is a relevant topic to begin with, start here at the beginning of this series.
A Brief Review
Since it has been a while, I think it will be helpful to have a quick reminder of where we left off with TrustSec classification.
- CTS Security Group assigned to a user/server/thing defines what that user/server/thing is allowed to do on the network.
- CTS Security Groups (SGTs) are created/configured on Cisco ISE.
- SGTs are dynamically classified by Cisco ISE when an endpoint is authenticated by Cisco ISE (be it 802.1x or MAB).
- SGTs are statically classified by Cisco ISE when an endpoint does not authenticate through Cisco ISE (typically servers).
One final thought here. This series in no way covers all the options for implementing CTS (i.e., your mileage may vary)! We are focusing on CTS capable networking equipment and using ISE as a central database for CTS classification!
TrustSec SGT Propagation
Here we have arrived at the meat (or tofu?) of the conversation! We now know how ISE classifies and assigns SGTs to endpoints connecting to the network. This is great! Onto the next problem à propagation. When using ISE as your central repository for SGT classification/assignment, as we’ve focused on here, we have two propagation problems to solve. First, how does ISE propagate its SGT assignment for an endpoint down to the CTS capable switch (We’ll call this ISE Propagation)? Second, how does the CTS capable switch propagate it from that point on (We’ll call this Network Propagation)? We’ll tackle the first part first; ISE propagation!
ISE Propagation
The way in which ISE propagates the SGT assignments is directly tied to which mechanism of SGT classification was used; dynamic or static.
ISE Propagation – Dynamic Assignments
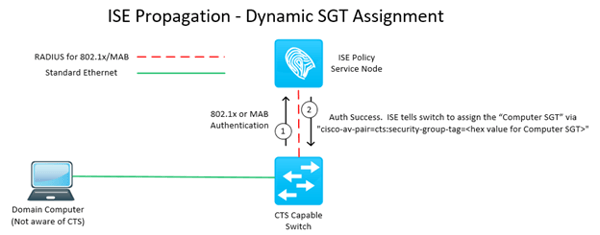
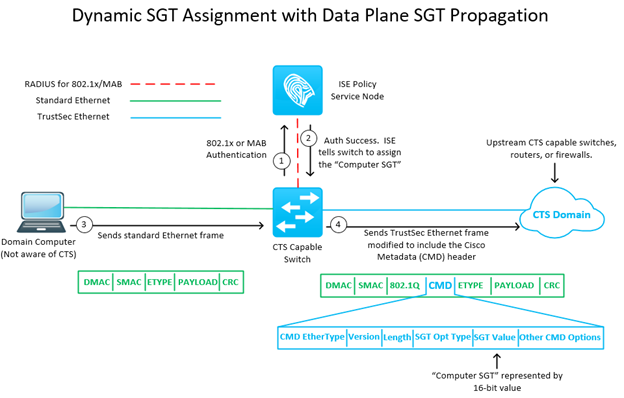
With dynamic classifications, the propagation down to the authenticating network device happens automatically as a part of the RADIUS Authorization. When the matching ISE authorization rule assigns an SGT, ISE sends this RADIUS authorization attribute back to the 802.1x authenticator network device.
|
RADIUS Attribute |
Value |
|
cisco-av-pair |
cts:security-group-tag=<CTS Group #> |
Assigning an SGT to an authorization rule is all it takes to make this happen!
ISE Propagation – Dynamic Assignments – Configuration
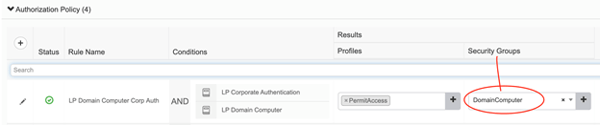
As the configuration needed here is one in the same as making the dynamic classification, which we’ve already covered in the previous entry, I’ll just leave this screenshot of the ISE authorization rule here. For full context around this, refer to the previous entry on CTS classification.
ISE Propagation – Dynamic Assignments - Verification
Let’s just make sure we’ve sent that previously mentioned ‘cisco-av-pair’ RADIUS authorization attribute back down to the CTS Capable Switch. We will check the authentication session status for the endpoint in question to ensure the SGT dynamic assignment was received from ISE.
|
Commands |
Output (some removed) |
|
show access-session mac <mac> details (IBNS2.0) show auth session mac <mac> details (IBNS1.0) |
Server Policies: SGT Value: 7
|
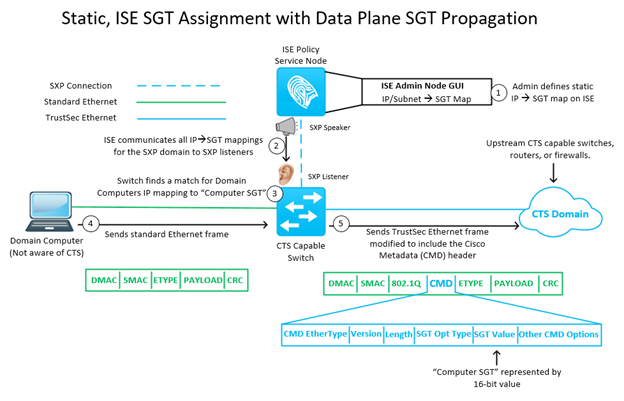
ISE Propagation – Static Assignments – SGT Exchange Protocol (SXP)
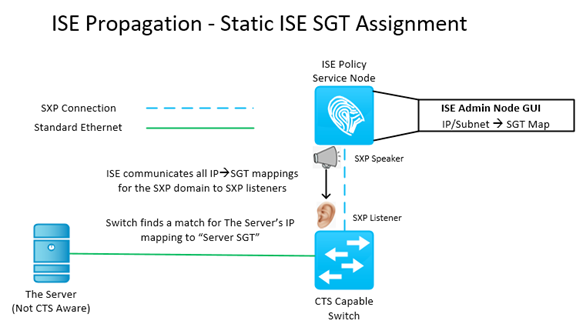
Propagating static classifications is an entirely different ballgame. There is no provision inside the RADIUS protocol for propagating this type of information. As such, this is where we introduce the SGT Exchange Protocol, or SXP. SXP is a control plane protocol which was specifically designed and implemented for the express purpose of propagating SGT information. Thank Goodness! I was worried there for a minute! SXP rides over TCP/64999 and each connection consists of a speaker and a listener. There are many design permutations where ISE can be a speaker and a listener, speaker only, or listener only. Same is true for the network devices. It is also entirely possible to NOT use ISE at all and still implement CTS/SXP (I wouldn’t recommend it!). Reminder! Reminder! We are not covering the entire problem space in this series, as such we will strictly focus on ISE as an SXP speaker and our CTS capable switches as SXP listeners. That being said, in our case SXP consists of a connection made between one speaker (ISE) and one listener (CTS capable switch) as depicted below.
Some additional configuration is required on ISE and the network device in order to create the SXP connection depicted above.
ISE Propagation – Static Assignments - CTS Capable Switch SXP Configuration
|
Variable Name |
Variable Description |
|
$SXP-Password |
MD5 integrity/authentication |
|
$ISE-SXP-PSN1 |
ISE SXP Speaker IP 1 |
|
$ISE-SXP-PSN2 |
ISE SXP Speaker IP 2 |
|
$Source-IP |
Local source IP to use |
|
Configuration |
|
! cts sxp enable cts sxp default password $SXP-Password cts sxp connection peer $ISE-SXP-PSN1 source $Source-IP password default mode local listener cts sxp connection peer $ISE-SXP-PSN2 source $Source-IP password default mode local listener ! |
ISE Propagation – Static Assignments – ISE SXP Configuration
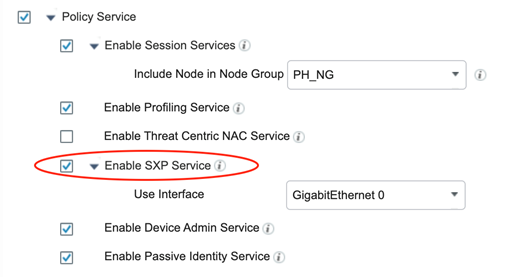
To begin we must enable the SXP service on one (or more) PSN’s in the deployment. Navigate to Administration > Deployment > Select a PSN > General Settings and ensure “Enable SXP Service” is checked.
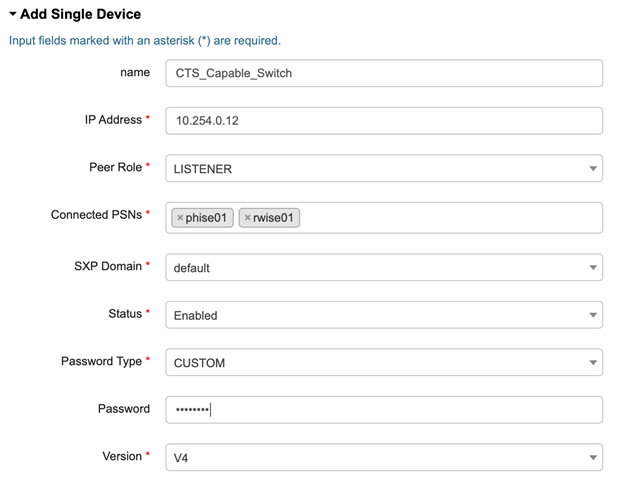
Next, we need to add the CTS Capable Switch as an SXP Device. Navigate to Work Centers > TrustSec > SXP > SXP Devices and click . Enter the required information and save!
ISE Propagation – Static Assignments – SXP Verification
Now that we have configured the SXP connection, first let’s check that the connection is up!
CTS Capable Switch Validation:
|
Commands |
Output (some removed) |
|
show cts sxp connections |
---------------------------------------------- Peer IP : 10.100.20.10 Source IP : 10.254.0.12 Conn status : On Local mode : SXP Listener ---------------------------------------------- Peer IP : 10.200.20.10 Source IP : 10.254.0.12 Conn status : On Local mode : SXP Listener
|
ISE Validation:
Navigate to Work Centers > TrustSec > SXP > SXP Devices
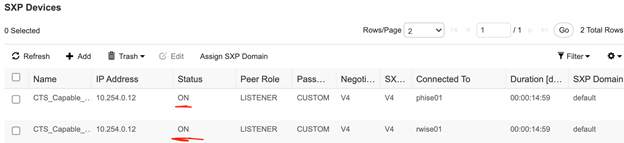
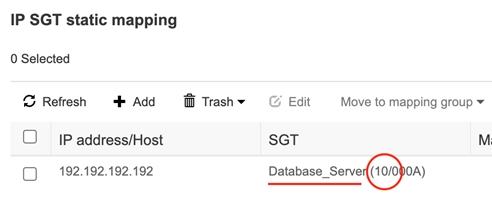
Cool cool cool, the connection is up! Now let’s test adding a static mapping on ISE and see if it makes it down to the switch. Navigate to Work Centers > TrustSec > Components > IP SGT Static Mapping. We added this one below which says the IP address of 192.192.192.192 belongs to the Database_Server SGT. Notice the circled number that corresponds to the SGT name. The switch will reference this number to represent the SGT mapping for this IP address.
Okay, let’s check the switch.
|
Commands |
Output (some removed) |
|
show cts sxp sgt-map |
IP-SGT Mappings as follows: IPv4,SGT: <192.192.192.192 , 10> Peer IP : 10.100.20.10;
IPv4,SGT: <192.192.192.192 , 10> Peer IP : 10.200.20.10; Total number of IP-SGT Mappings: 2
|
Sweet! We received the static mapping from both our ISE PSN’s (10.100.20.10 and 10.200.20.10). You will note that we don’t see “Database_Server” listed, but instead the SGT group number 10, which maps to it. That covers ISE propagation to the level at which we need, at this point. So far we’ve only discussed SXP in the context of advertising static mappings, however, it can also be used to advertise dynamic mappings across different CTS Domains (CTS islands!) We’ll get there, but for now crawl, walk, run! Alright, let’s check out Network Propagation.
Network Propagation
You may be asking yourself, why do we need the network to do anything? Didn’t ISE just give the SGT mappings to the CTS Capable Switch? You’ll remember from our CTS Primer that when we get to the CTS enforcement phase, our enforcer will need to know both the source and destination SGT values in order to apply the SGACL (Security Group ACL). So far, we’ve given our CTS Capable Switch enough information to know about all the dynamic SGTs assigned to endpoints connected to it. What about the SGTs of endpoints connected to another CTS Capable Switch? Sure, sure I know what you’re thinking, or rather what you should be thinking if you’ve been paying attention so far! Won’t ISE use SXP to tell me about all of those? Well, the answer is, yes, yes it could. But…
A brief detour into the main drawbacks of SXP
ISE will, by default, include both dynamic and static SGT assignments in its role as a SXP speaker. Then the next question that should come to mind is, is there any reason I wouldn’t want to do that? Well, the answer is yes, yes there is. And that answer is scalability. We haven’t discussed this much, yet, but under the hood a dynamic/static SGT assignment is really a mapping of an endpoints IP address to a SGT. The more of these mappings a network device needs to hold onto, the more memory it requires. We’ve always been concerned with TCAM space for ACE/ACL entries on our network devices. Welp, I’m sorry to report that we need to worry about TCAM space for our IP:SGT SXP bindings when using CTS. Ok, so scalability is the big one. The other is that in-band/data-plane SGT propagation is easy, it just happens, so with SXP you’ve got an additional protocol/state/overhead to manage/maintain. This is where my all-important rule about using SXP comes into play. Use it (SXP) only where you absolutely must. Great! Thanks! Sage advice! Wait, WHAT? Where must I use it? It depends! In a full featured CTS domain (meaning all network devices in the path of traffic support inline SGT tagging & SGACL), you want to give the last hop switch/router in the CTS domain all the IP:SGT mappings for any destination beyond it (outside of the CTS domain). Ok, detour over. I know this is messy in your mind right now, and that’s likely my fault! Fear not, pretty pictures forthcoming! For now, back to the tofu of this section: data plane propagation.
Network Propagation – Data Plane Propagation
You’ll recall from a previous entry, Cisco created a new packet/frame header called “Cisco Metadata”. This is the magic header where Cisco CTS capable network devices can insert the source SGT information. Important italic there in case you missed it - source SGT. That’s right, only the source SGT is carried in the data plane. Because why? Filter on egress! All of the gains in scalability of CTS are based on the principle of filtering at egress of the CTS domain. Let’s drive this point home real quick using a concrete example. Take a network where we have, I don’t know, 10,000 IP:SGT mappings. If I filtered at ingress of a CTS domain, that means that each one of my ingress CTS capable switches would need to know all 10,000 of those mappings, so that it had knowledge of all source/destination IP:SGT bindings in order to apply the appropriate SGACL. Yikes! This is opposed to filtering at egress, where each one of my ingress CTS capable switches only needs to know about the IP:SGT bindings of the directly connected endpoints. So let’s say 96 IP:SGT bindings for a 48-port switch with a PC and phone connected to each port. As the ingress CTS switch, I pop the source SGT onto the packet and forward it along to the next hop in the CTS domain. Once it reaches the egress CTS capable switch, that switch knows the destination SGT already, because it is a directly connected endpoint! Voila, the egress switch has the source SGT from the dataplane packet/frame, and it has the destination SGT for the directly connected endpoint (retrieved either statically from SXP or dynamically from 802.1x/MAB auth). Here is a picture of how/where that tricky “Cisco Metadata” header fits in both a static and dynamic scenario.
Network Propagation – Configuration
You will want to enable these commands on any ports connecting to another CTS capable devices in your CTS domain.
|
Commands |
Description |
|
interface ten1/1/1 description To CTS Capable Device cts manual policy static sgt $Default-SGT trusted propagate sgt
|
Enables the interface to receive and transmit frames using the Cisco Metadata header. If we receive a frame from the device on the other end of this link without an SGT defined, we impose our $Default-SGT (numerical value of SGT), otherwise “trust” the SGT we received. |
Network Propagation – Validation
Not much to see here, but you’ve got a show command that essentially spits your configuration back at you.
|
Commands |
Output (some removed) |
|
show cts interface ten1/1/1
|
Interface TenGigabitEthernet1/1/1: CTS is enabled, mode: MANUAL Authorization Status: INCOMPLETE Peer SGT: 2 Peer SGT assignment: Trusted Propagate SGT: Enabled
|
Example CTS Domain – Bigger Picture
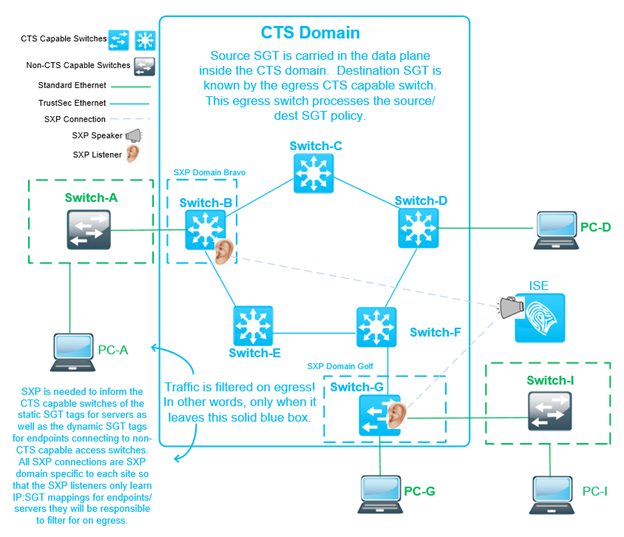
I’ll admit, CTS can be a tough pill to swallow. Sometimes it helps to look at the big picture for things to finally click! Here is an example CTS Domain will help at illustrating the points I’ve been attempting to convey here. Let’s talk through a couple packet flows, using this diagram (below) as a reference, focusing solely on the propagation of SGTs.
Packet from PC-G to PC-D using Dynamic SGTs
- Switch-G receives the packet, looks up the SGT assigned to PC-G by ISE from PC-G’s auth.
- Switch-G adds the Cisco Metadata header to the packet specifying PC-G’s SGT.
- Switch-G forwards the packet to Switch-F, who forwards to Switch-D (normal switching)
- Switch-D receives the packet, looks up the SGT assigned to PC-D by ISE from PC-D’s auth.
- Switch-D applies SGACL for traffic from PC-G SGT to PC-D SGT.
Packet from PC-A to PC-I using Static SGTs
- Switch-B receives the packet, looks up the SGT assigned to PC-A by ISE from SXP.
- Switch-B adds the Cisco Metadata header to the packet specifying PC-A’s SGT.
- Switch-B forwards the via normal switching, until its eventual arrival at Switch-G
- Switch-G receives the packet, looks up the SGT assigned to PC-I by ISE from SXP.
- Switch-G applies SGACL for traffic from PC-A SGT to PC-I SGT.
What’s Next?
The fun has only begun! We’re primed, we’re classified, we’re propagated, and we are ready to block some traffic! Next stop on the TrustSec train à Enforcement! Thanks for hanging in there!
As always if you have any questions on getting Cisco's ISE set up for you and your business and would like to schedule a free consultation with us, please reach out to us at sales@lookingpoint.com and we’ll be happy to help!

Check out our awesome tech talk on ISE:
Dominic Zeni, LookingPoint Consulting Services SME - CCIE #26686